
Benefits of using a KDS
Are you considering purchasing a Kitchen Display System (KDS), or have you just got one and are unsure if you made a good decision? In my opinion, a KDS is an excellent decision, as long as you are ok with the cost. The benefits include:
- Improved kitchen efficiency with better and faster communication between servers and kitchen staff
- Real-time view of the restaurant operations and speed of service with colors and timers
- Enhanced Kitchen Performance reporting
- Save paper
If you have an existing KDS and want to know more about it, or you just purchased one and want to know how to configure it from scratch, this article is for you! I will cover the following:
- How to configure your KDS controller in EMC to make the most out of your system
- How to deploy CAL packages to the KDS controllers and screens
- How to configure KDS displays
- How to configure KDS Bump Bars and Tool Bars
We have a lot to cover, so let’s dive in!
Programming your KDS can be very complicated and each restaurant is unique, luckily for you, we have a fantastic Facebook community of like-minded individuals that can answer all your questions! Join for free below!
KDS Components
Before we start configuring anything in EMC, we should make sure we have everything we need to make the entire system work. So let’s take a look at the different components:
- KDS Controller – A program running on a workstation or server that facilitates the communication between the workstations and screens (we will need two controllers: primary and backup)
- KDS Screen – A monitor and Remote Display Controller (RDC) Client assembly that gets mounted in the kitchen to display orders
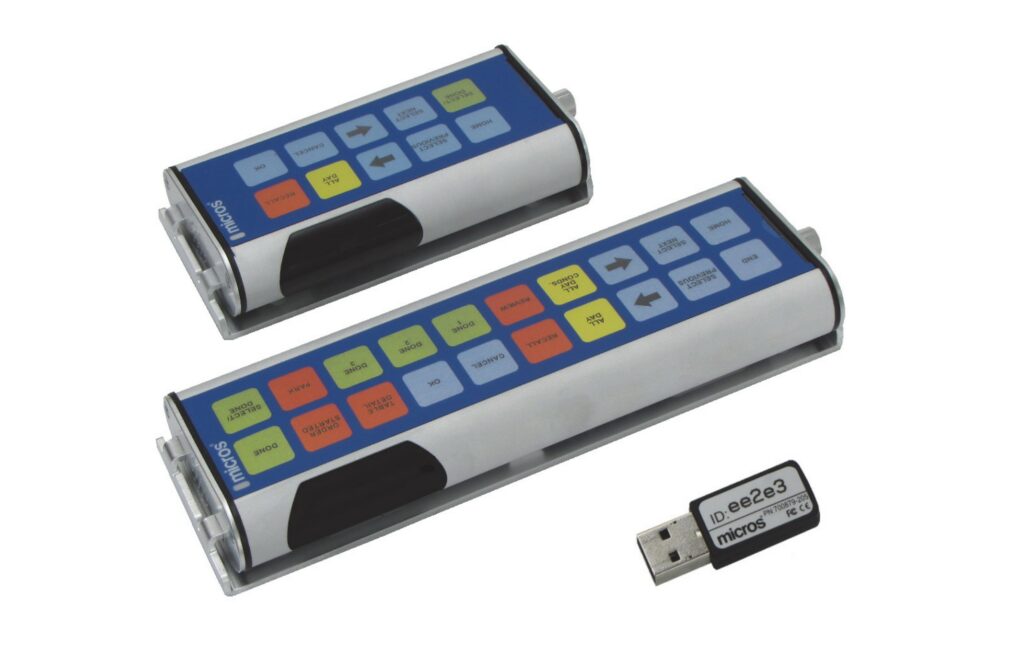
- Bump Bar – A small metal bar with buttons on it to bump and recall items
- Tool Bar – A digital bump-bar that can be displayed on the monitor – needs to be a touchscreen
Besides all these items, your KDS system will also come with various brackets, power addapters, and cables.
Simphony Licences
Just like any other hardware, the KDS needs to have a valid license in order to function properly.
You can double-check your license count in EMC. Go to the Enterprise Level, Enterprise Parameters. In the License Configuration tab, check the number of available licenses for KDS. If you need more, you can contact your Oracle salesperson or project manager.
Configuring the KDS Controller
As I mentioned before, the KDS controller is a software program that needs to run on a workstation or server, and it’s the brain of the operation.
You will need both a Primary controller and a Back-up Controller setup on two different devices. (it’s the same controller, just two different instances of it)
Important Note: These two hardware devices need to be very powerful. If you use workstations, ensure they are the highest spec ones (655X), or even better, use actual servers/PCs. I have seen many issues when KDS controllers are weak, so don’t risk it.
The KDS Controller can be found at the Property Level, under the Setup tab -> KDS Controller. Use the Insert key to add a new one or configure an existing one.
KDS Controller General Tab
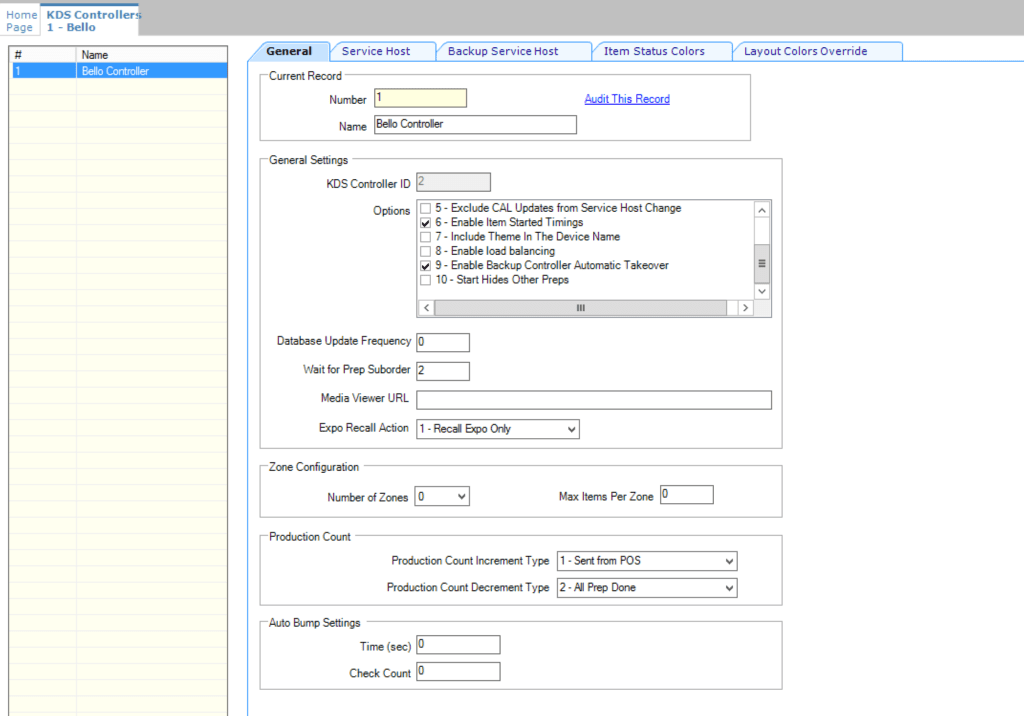
This is how I configured my KDS Controller.
If you want to know what each option bit does, I will detail each one:
| Fields and Options | Description |
|---|---|
1 – Prevent Chit Bump on Expo Display if Chit Exists on Prep Display | Select this option to prevent a chit from being bumped from an Expo Display if the chit still exists on one of the Prep Displays. |
2 – Display Next Course after Previous Course Complete | Used with Dining Courses. |
3 – Show Only Active Orders | Select this option to allow a Speed of Service (SOS) Display to show only tables that have open orders. |
4 – Expo-only Items Display as Done | Select this option to change the status of menu items that do not go to Prep Stations to Done when they fire. |
5 – Exclude CAL Updates from Service Host Change | If the property does not use the CAL, select this option to exclude updates to CAL for Service Host changes made in the KDS Controller. |
6 – Enable Item Started Timings | If the KDS is not using Dynamic Order Mode (DOM) and is configured to show every item in an order on separate chits (from the Order Devices module set KDS Option 3 – Single Item Per Sub-Order), select this option to have KDS recalculate an order’s target done time (TDT) when the kitchen staff starts on the item with the longest prep time. After the KDS recalculates the TDT, the system adjusts all of the fire times for the remaining items (based on individual prep times) to ensure that all items complete at the new TDT. When using this feature, Simphony automatically starts unstarted orders when bumped from KDS Displays. |
7 – Include Theme In The Device Name | Select this option to have the KDS show the current Kitchen Theme after the name of the device on the KDS status bar. |
8 – Enable load balancing | Select this option to dynamically distribute incoming orders to KDS Prep Stations. KDS Prep Stations are assigned to distribution groups and orders route to the KDS Prep Station according to their current load of non-bumped items. |
9 – Enable Backup Controller Automatic Takeover | If the KDS Controller has a backup service host, select this option to allow the backup KDS Controller to take over automatically when the primary controller is down. |
10 – Start Hides Other Preps | Select this option to have orders disappear from all other KDS Prep Stations when a kitchen staff member marks an order chit as started using Order Start or Order Start First on one KDS Prep Station. |
11 – Prevent bump while ordering | Select this option to prevent KDS users from bumping chits corresponding to orders that are still in the process of being taken by the workstation operator. When selected, the KDS shows the word Ordering at the footer of the chit. This feature is only supported in revenue centers that have option 50 – Enable Dynamic Order Mode (DOM) set and when using DOM Types Fire On Fly and Fire On Next. To use this feature, you must configure a chit layout that shows the subtotal field or enable Order Devices option 9 – Display Subtotal. |
12 – Recall to Original Position | Select this option to have recalled orders appear in their original position prior to being bumped. When deselected, recalled orders appear first on the display. |
Database Update Frequency | Enter the number of seconds you want the KDS Controller to wait to retrieve the latest updates from the database. The default value is 1800 seconds (30 minutes). The value in this field overrides the Property Parameter’s Database Update Frequency setting. |
Wait for Prep Suborder | If the property is using dining courses, enter the number of seconds that you want the KDS to wait for Prep suborders before displaying an expo order as All Prep Done. Oracle recommends entering a value of 1 or 2. The value 0 (zero) is ignored. |
Media Viewer URL | Enter the machine name of the Media Viewer server (for example, MyPC). Media Viewer does not currently support HTTPS and assumes the use of port 80. If you change the port number for the Media Viewer site through the Internet Information Services (IIS) Manager, append the port number to the machine name. For example, MyPC:[PORT]. |
Expo Recall Action | Select the location for orders to appear when they are recalled from an Expo or SOS display:
|
Number of Zones | Used with Dynamic Display and Kitchen Zones. |
Max Items Per Zone | Used with Dynamic Display and Kitchen Zones. |
Production Count Increment Type | Select the option to Increase Production Items for KDS. |
Production Count Decrement Type | Select the option to decrease Production Items for KDS. |
Time (sec) | Enter the number of seconds to elapse before automatically bumping all closed orders after reaching the Check Count. |
Check Count | Enter the number of checks that are allowed to appear on the KDS before automatically bumping. |
KDS Controller Service Host and Backup Tabs
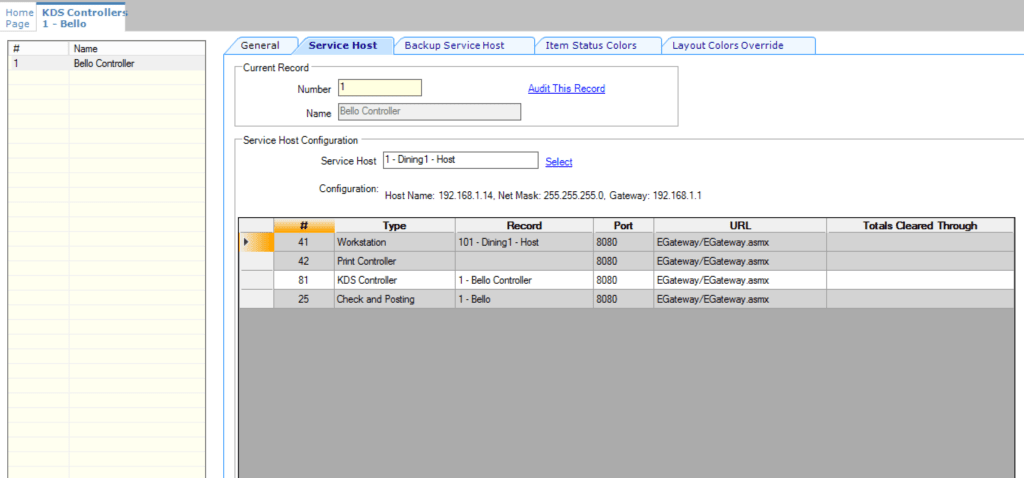
In these two tabs, we will identify which hardware devices will host the Primary Controller and the Backup controller.
In my Test Lab, I have both CAPS and the Primary KDS Controller assigned to Dining 1. This is not a good idea for real scenarios.
Both CAPS and KDS are resource-intensive services, so keep them on separate devices.
KDS Controller Item Status Tab
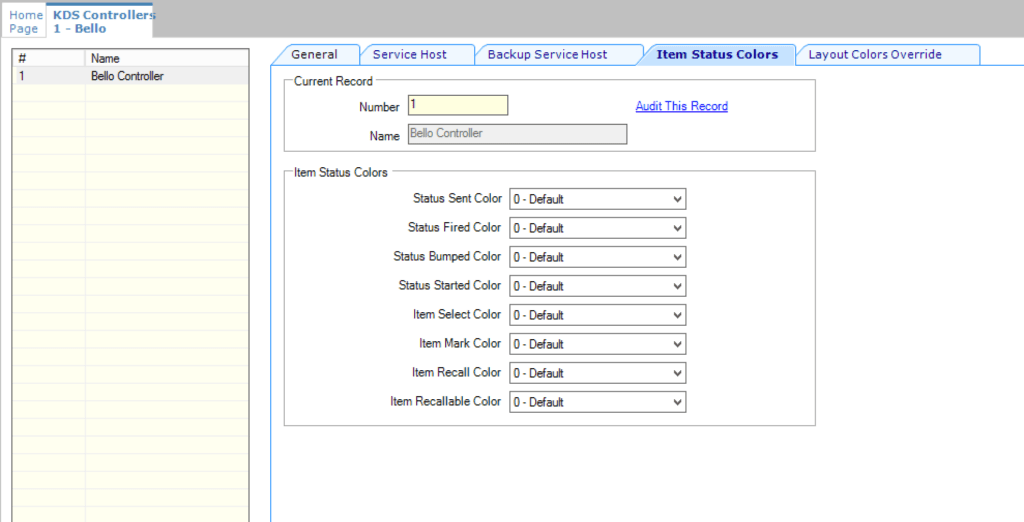
In this tab, you can change the colors of the different items on the KDS screen to make them more visible. I keep mine as defaults, but you can assign different colors for items that are bumped, selected, marked, or recalled.
KDS Controller Layout Colors Override Tab
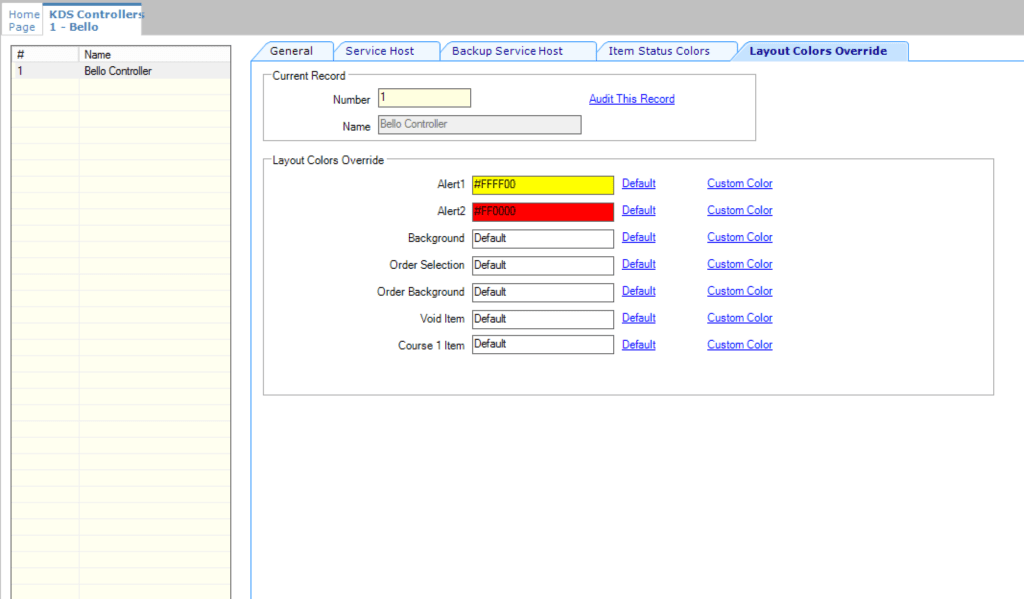
As I mentioned before, one of the big advantages of using a KDS vs. a traditional printer is the controller over the speed of the kitchen. In this tab, we can adjust the colors for the different statuses of checks. The two time-alerts default to yellow and red, but you can adjust them here. When a check has been on the screen for a set amount of time, it will turn yellow and then later red to signal to the kitchen that the orders are late. These times are adjustable based on the type of restaurant you are running. (Set the number of seconds in the Order Devices module).
You can also set unique colors for checks that contain voided items or different courses.
For more Free Content on other Simphony Hardware Modules, also check out my article on Micros Hardware.
KDS Bump Bars
In order to operate your KDS, you can choose to use a bump bar or, if you have a touchscreen monitor, a toolbar.
I will show you how to configure both, and you can choose which one works better for you.
KDS Bump Bars can be configured at the Enterprise and Property levels under the Setup tab -> Bump Bars.
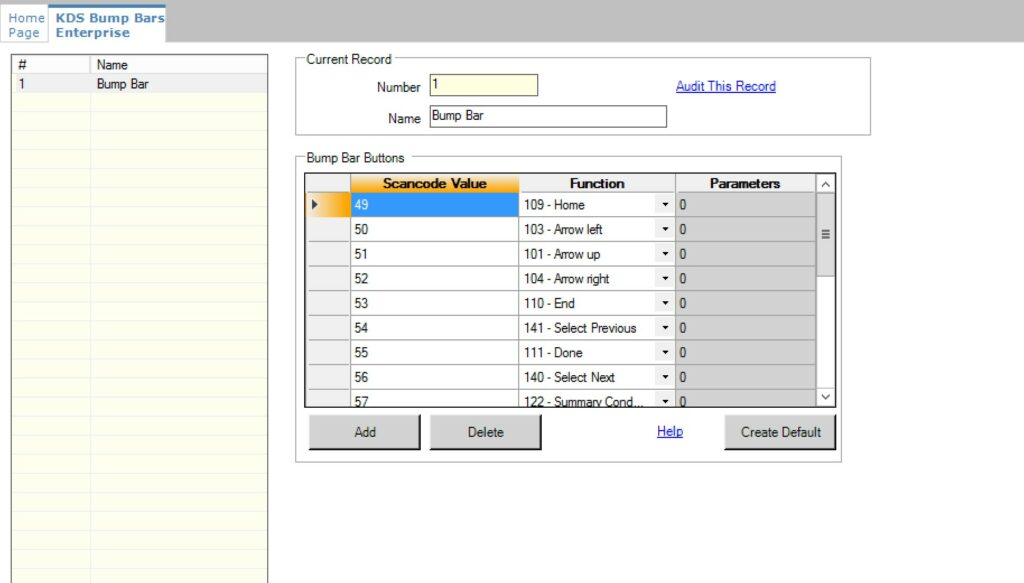
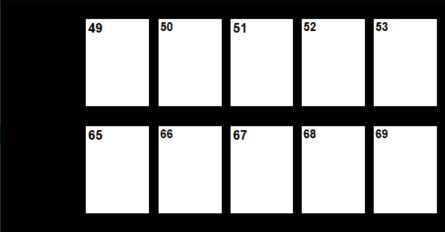
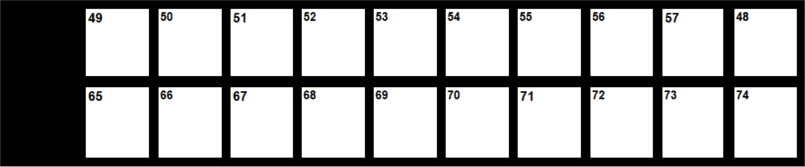
Here you can configure functions for the buttons of the Bump Bar. The configuration is not very descriptive, but the Scancode Value coincides with each button on the physical device.
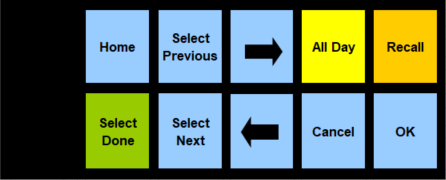
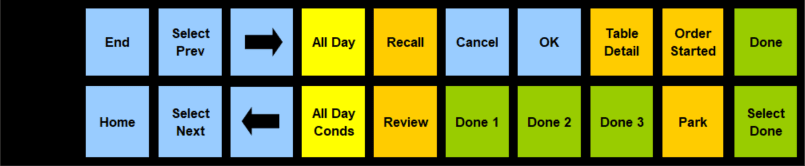
Here is the layout of the buttons and their default functions:
Mini Bump Bar
Standard Bump Bar
Here is a complete list of all the different functions you can assign to both Bump Bars and Tool Bars:
Arrow down – Moves the display down one position.
Arrow left – Moves the display one position to the left.
Arrow right – Moves the display one position to the right.
Arrow up – Moves the display up one position.
Cancel – Cancels the last entry.
Close – Exits the application. (not recommended)
Cook Summary – Shows a consolidated list of items sorted by status.
Done – Marks the selected order as done and removes it from the display.
Done 1 – Marks Order 1 as done and removes the chit from the display.
Done and Select First – Marks the first order on the display as complete and selects the next order.
Done Item – Marks the selected item as done and removes it from the display.
End – Moves to the last page of the display.
Fire Item – Sends an item on hold because of prep timing on Expo Displays to the Prep Station before automatically firing.
Fire Order – Sends all items on hold because of prep timing on Expo Displays to the Prep Station before automatically firing.
Home – Moves to the first page of the display.
Mark – Marks an order so that it cannot be bumped.
Mark First – Marks the first order on the display so that it cannot be bumped.
Mark Item – Keeps items on the display. This helps keep large orders together.
Media viewer – Shows media files related to items in an order, recipe preparations, or other work-related tasks.
OK – Accepts the last entry.
Order Started – Mark an order as started.
Order Started First – Marks the first order on the current page as started.
Page down – Moves the display down one page at a time
Page Left – Moves the display one page to the left.
Page Right – Moves the display one page to the right.
Page up – Moves the display up one page at a time.
Panel Swap – Switches the focus from one panel to another on the display.
Prep Start/Stop – Changes an item’s status to start for the Prep Station (only for single item per sub-order chits (SIPS)).
Priority Order 1 – Reorders the chit by priority, with Priority 1 being the highest and Priority 8 being the lowest.
Production Summary – Lists the names and counts of all production items currently in the kitchen.
Pull Order – Pull an order from another Prep Station in the Prep Station’s primary distribution group.
Push Order – Pushes an order to another Prep Station of your choosing in the revenue center.
Recall – Recall an order from the 50 orders marked as complete during the last 15 minutes and restarts the timer.
Recall Item – Recall an item marked as complete.
Recall Last – Shows the last order that was marked done and resumes the timer for that order.
Recall Last Item – Recall the last order marked as complete and restarts the timer.
Recall with Panel – Recall an order from a chit style listing of the last 50 orders marked as complete (or within the last 15 minutes), and restarts the timer.
Remote View List – Remotely view orders on another display by selecting from a list of displays that allow remote viewing.
Remote View Next – Remotely view orders on the first available display by record number and then go through all KDS Displays that allow remote viewing on subsequent key presses.
Remote View Specific – Remotely view orders on a specific display without having to select from a list.
Review – Recall an order from a list of the last 50 orders marked as complete (or within the last 15 minutes), without restarting the timer.
Review Last – Shows the last order marked as complete, without restarting the timer.
Review with Panel – Recall an order from a chit style listing of the last 50 orders marked as complete (or within the last 15 minutes), and does not restart the timer.
Select and Done – Marks the first order on the display as complete and removes it from the display.
Select First Unstarted – Selects the first order on the display that is not yet started.
Select Next – Selects the next order on the display.
Select Next Item – Selects the next item on the chit. Using this while selecting the last item, selects the first item of the selected suborder.
Select Next Unstarted – Select the next order that is not yet started.
Select Previous – Selects the previous order on the display.
Select Previous Item – Selects the previous item on the chit. Using this while selecting the first item, selects the last item of the selected suborder.
Start and Select First Unstarted – Starts the current order and selects the next unstarted order.
Summary Condensed – Shows active orders in list mode without condiments.
Summary Expanded – Shows active orders in list mode with their condiments.
Table Detail – Shows the order detail for the selected table.
Note: Many of the entries listed above are available as a P1 or P2 variant. These are used with the split screen monitor function to indicate whether the action applies to Panel 1 or Panel 2 on the KDS Display.
KDS Tool Bars
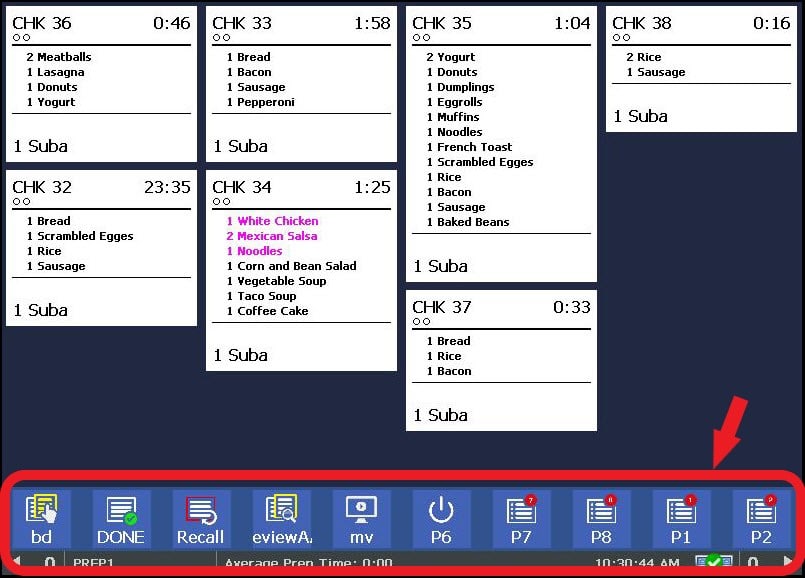
You can choose to use only Bump bars, only tool bars, or even a combination of both.
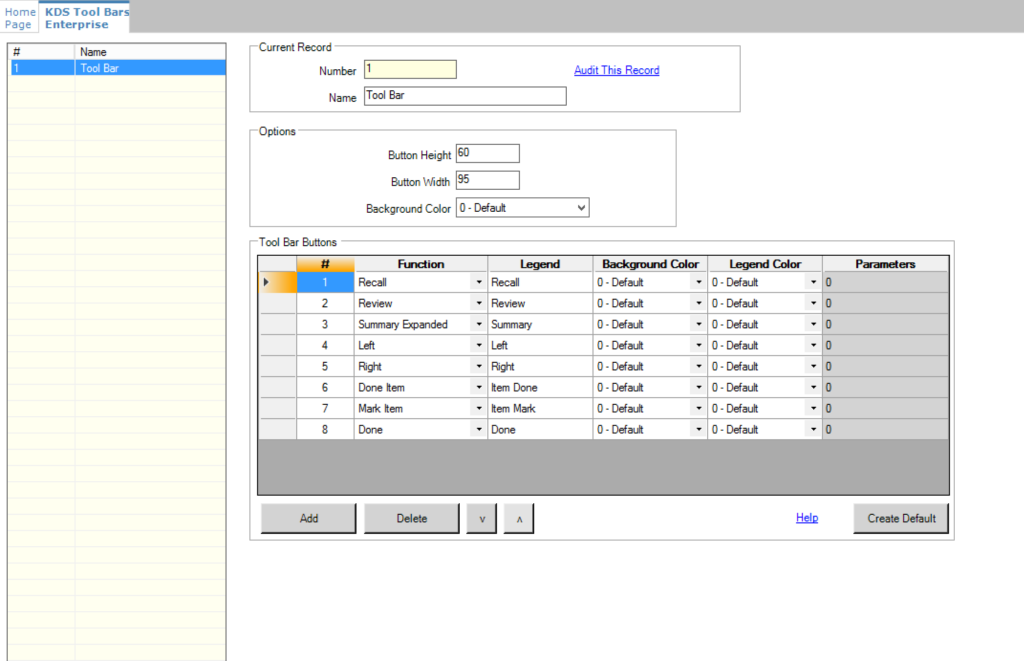
You may need to adjust the button height and width depending on the size of your screen and the number of buttons you want to display.
Here is how I have mine configured:
KDS Displays
KDS Displays are the devices we interact with the most in the kitchen, and they have two main components: the RDC controller, linked to the network and simphony, and a monitor. The new Oracle Express workstation 400 series combines both these devices in one unit.
In order to configure the KDS Displays, we need to add them in EMC. They can be found only at the Property level, under the Setup tab -> KDS Displays.
If you don’t have any defined, make sure to add them using the Insert button.
KDS Displays General Tab
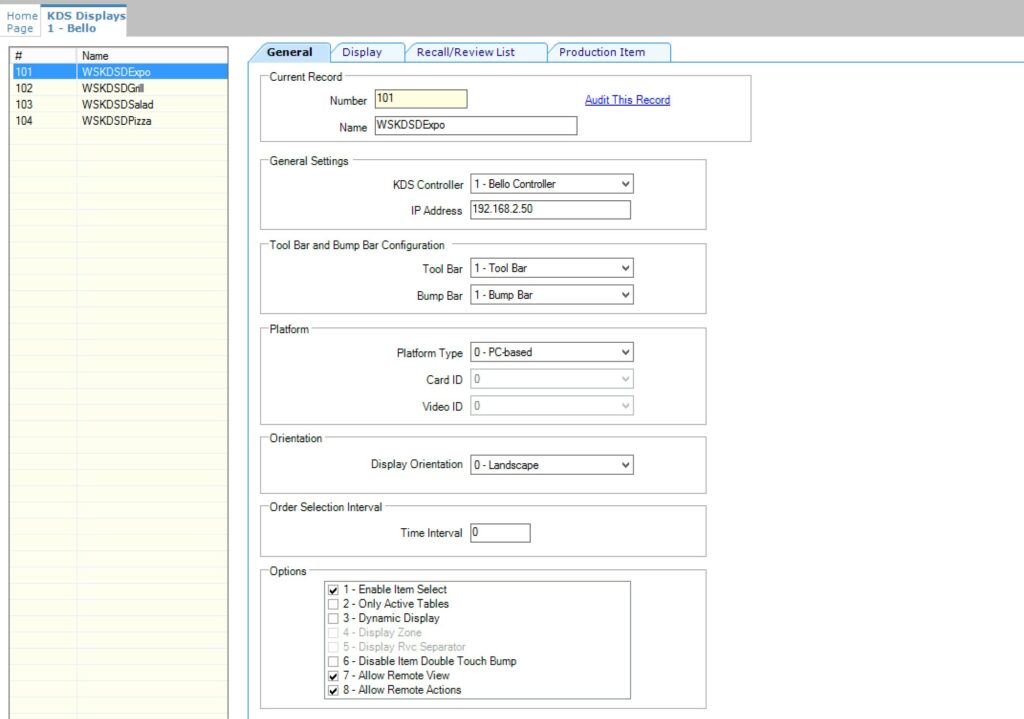
In the General tab, we will first add the device’s name and number.
If you are configuring a Windows-32 KDS Display (like the Express Workstation 400 series), append the prefix WSKDSD to the KDS Display name (for example, WSKDSDExpo). Do not include a space in the display name.
Next, assign the KDS Controller – you will most likely have only one option here. And the IP address.
Assign the Tool Bar and Bump Bar next and the platform type. Most KDS Displays are PC-based.
There are several option bits here as well; I selected: #1, #7 and #8.
KDS Displays General Tab
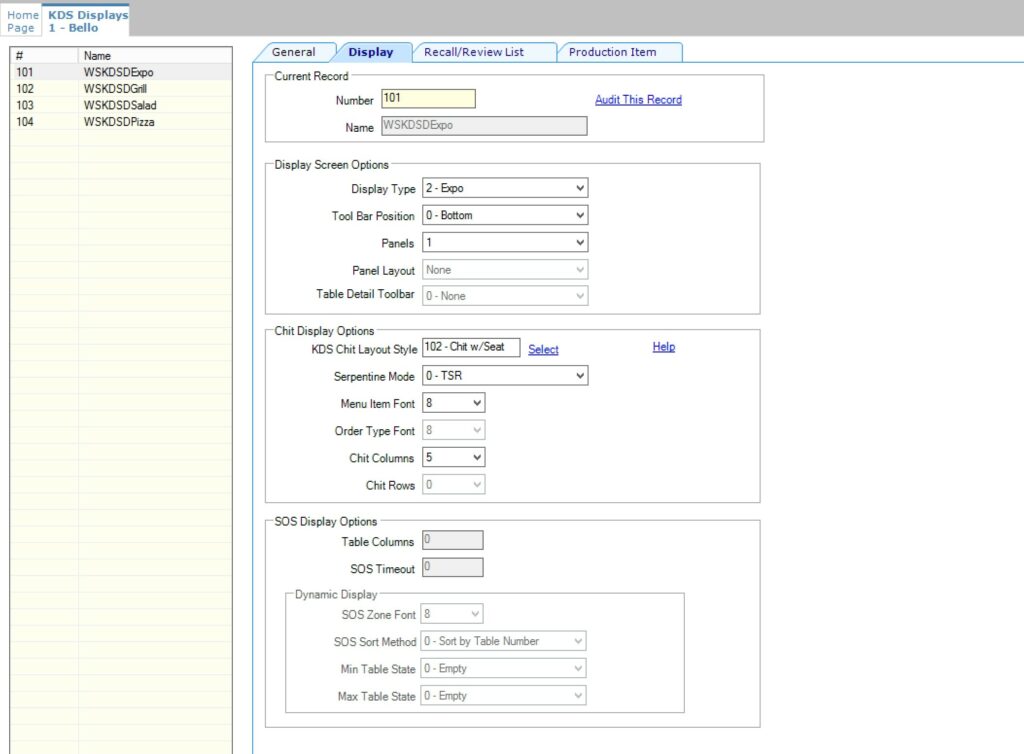
In the display tab, we will choose the type: Expo, Prep, and SOS.
The SOS (Speed of Service) display allows managers to continuously monitor the status of all tables in the restaurant. (Optional)
The Expo (Expediter) shows all orders for the kitchen, allowing the expediter chef to control the flow of the orders and preparation times.
Prep Displays are the most common ones in the kitchen. They are used to show orders at preparation stations in the kitchen.
This is also where you choose the KDS Chit Layout Style and the Serpentine Mode. For sample Chit Layouts, click the Help hyperlink.
KDS Displays Recall/Review List
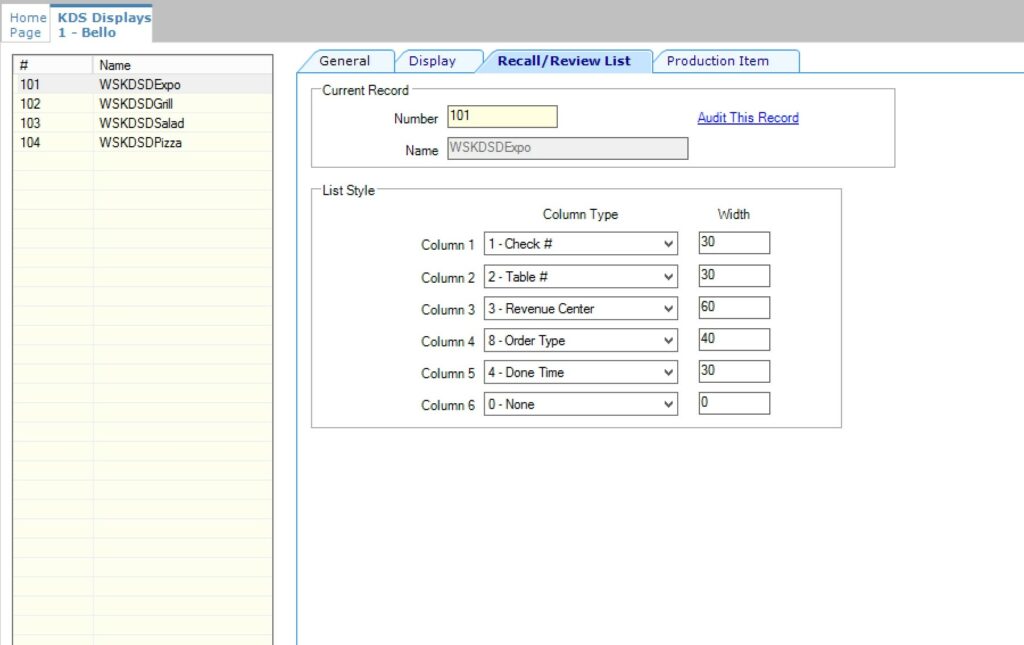
In this tab, we can define the fields that show in the pop-up window that appears when we press the recall/review button. Set the width accordingly so all the information will fit on the screen.
KDS Displays Recall/Review List
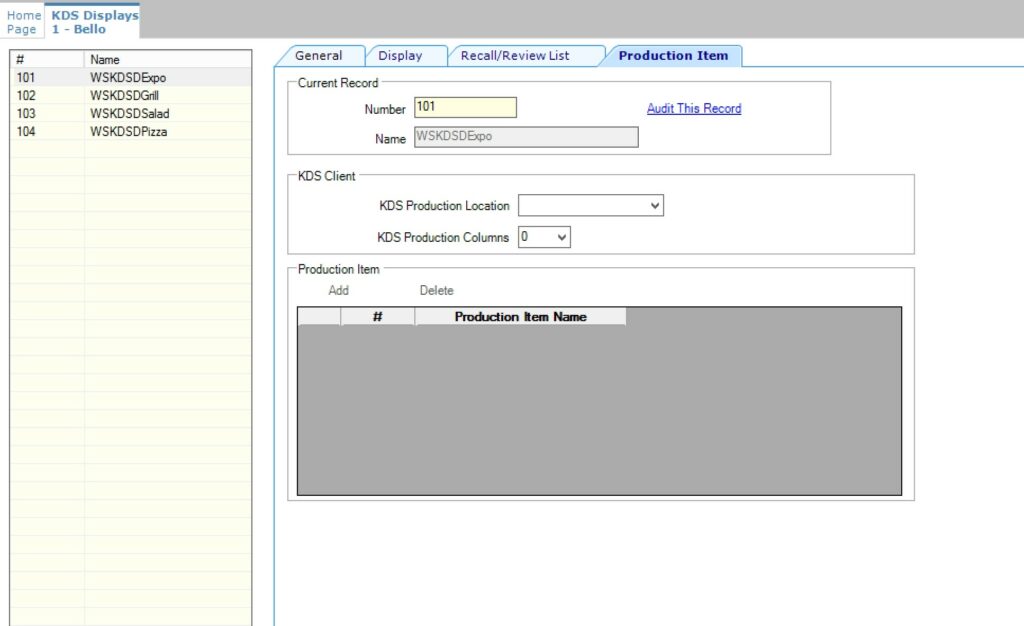
The final tab contains the production items. This is optional, but it can help, especially in fast-paced restaurants with standardized menus.
A great example would be in a burger place like Mcdonald’s or Burger King. If there are many orders on the KDS, the production items would be the total number of buns, burger paddies, and fries. The system knows the recipes for each item and knows how many patties it contains, and it displays the total at the bottom.
KDS Order Devices
Now that we have everything configured for the hardware, we need to link them to the menu item, and we do this via the Order Devices.
We can find order devices at the RVC level under the Setup tab -> Order Devices. You can add new devices using the Insert key or configure existing ones.
KDS Order Devices - General Tab
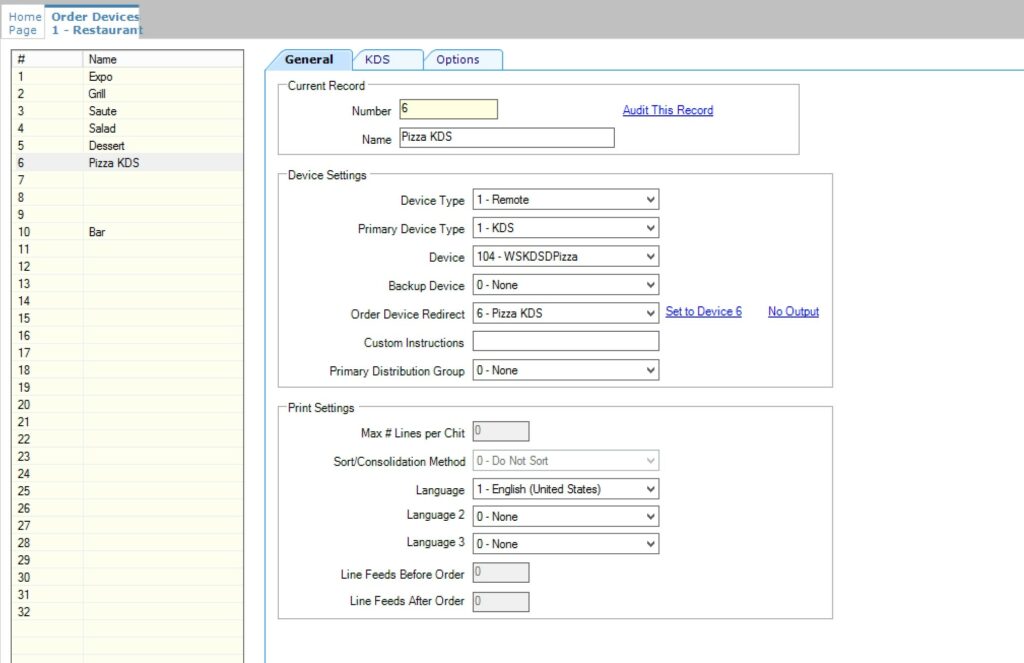
In the General Tab, we will first assign it a name and number. Select the device type as remote, and then choose KDS.
From the Device drop-down, select the KDS Display that we just added in the previous module. Do not add a back-up here, that field is only for printers, we will add the backup in the KDS tab.
For the Order Device Redirect, it must redirect to itself in order to work correctly. It sounds strange, but the only other option is “no output”, which will cause the KDS to stop receiving orders.
KDS Order Devices - KDS Tab
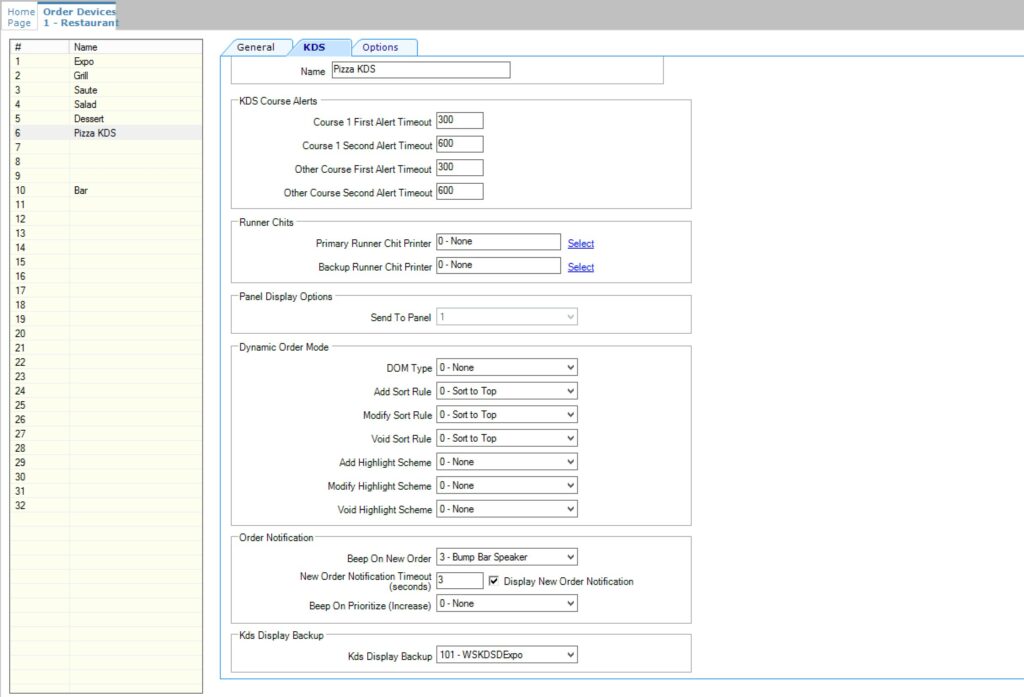
Here is how I have mine configured.
Here is complete list of what all the options do:
| Field | Description |
|---|---|
Course 1 First/Second Alert Timeout | If you are using the KDS Coursing function, enter the time in seconds when course 1 items display the first alert and second alert respectively. Chits showing a first alert are shaded yellow, while the chits showing a second alert are shaded red. |
Other Course First/Second Alert Timeout | If you are using the KDS Coursing function, enter the time in seconds when any course except course 1 displays the first and second alert respectively. Chits showing a first alert are shaded yellow, while the chits showing a second alert are shaded red. |
Primary Runner Chit Printer | Select a printer where runner chits print when orders are bumped from the KDS device. |
Backup Runner Chit Printer | Select a printer where runner chits print when orders are bumped from the KDS device if the application cannot establish communication to the primary runner chit printer. |
Send To Panel | Select the panel where orders sent to this device should display. This field is only active when the order device contains more than one panel. |
DOM Type | Dynamic Order Mode – Orders appear as they are added on the workstation – for use in Fast Food scenarios where the kitchen can start cooking before the entire order is finalized. This feature is buggy and resource intensive, use it with caution. |
Add Sort Rule | This feature is only supported with DOM. |
Modify Sort Rule | This feature is only supported with DOM. |
Void Sort Rule | This feature is only supported with DOM. |
Add Highlight Scheme | This feature is only supported with DOM. |
Modify Highlight Scheme | This feature is only supported with DOM. |
Void Highlight Scheme | This feature is only supported with DOM. |
Beep On New Order | Select the sound type to emit when an order is received on the device. If you select 2 – WAV File, the application uses the default WAV file set for the operating system. |
Display New Order Notification | Select this option to make new orders flash when they appear on the KDS Display. This feature is not supported with DOM. |
New Order Notification Timeout (seconds) | Enter the length of time in seconds that newly added items should flash on the screen. When this threshold is reached, items appear normally. This field is only active when you select Display New Order Notification. |
Beep On Prioritize (Increase) | Select the sound type to emit when an order is assigned a priority and also when the priority of an order is increased on the order device. If you select 2 – WAV File, the application uses the default WAV file set for the operating system. |
Beep On VIP | Select the sound type to emit when a VIP order is received on the device. If you select 2 – WAV File, the application uses the default WAV file set for the operating system. |
Beep On Rush | Select the sound type to emit when a rush order is received on the device. If you select 2 – WAV File, the application uses the default WAV file set for the operating system. |
KDS Display Backup | Select the backup order device for the KDS Display. The backup order device must be another KDS Display linked to the current revenue center’s KDS Controller. |
KDS Order Devices - Options Tab
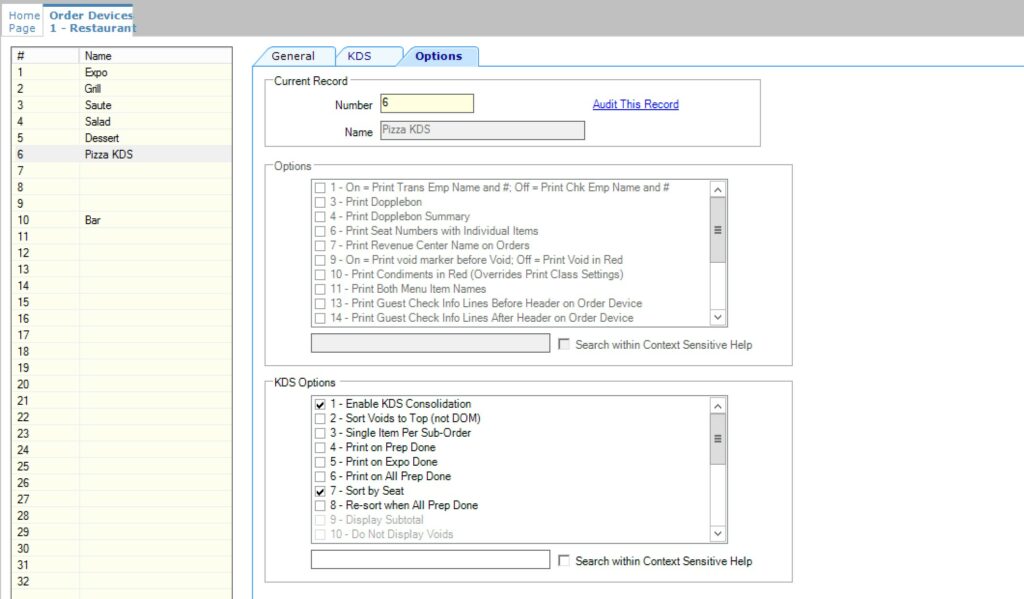
For option bits, I have selected: #1, #7, #13, #14, and #26.
Here are details as to what each option does:
| Option | Description |
|---|---|
1 – Enable KDS Consolidation | Select this option to consolidate identical items with different modifiers onto one line, preceded by the quantity on the KDS Display. KDS Consolidation is not supported with DOM or with any DOM KDS chit layout style. |
2 – Sort Voids to Top (not DOM) | Select this option to sort voided items to the top of the display. This feature is not supported with DOM. |
3 – Single Item Per Sub-Order | Select this option to show every item on an order on its own chit. This option is enabled for KDS Menu Item Prep Timing. If you are using KDS load balancing, Oracle Hospitality recommends that you set this option for the most equal distribution of menu items. |
4 – Print on Prep Done | Select this option to print a runner chit when the order is marked as Done at a Prep Station. Only items from this Prep Station print. |
5 – Print on Expo Done | Select this option to print a runner chit when the order is marked as Done at the Expo Station. |
6 – Print on All Prep Done | Select this option to print a runner chit when an order is complete at all Prep Stations and before the order is bumped from the Expo Display. |
7 – Sort by Seat | Select this option to sort check detail by seat number. Deselect this option to have items display in the order in which they were ordered. |
8 – Re-sort when All Prep Done | Select this option to cause the Expo Display to re-sort a chit to the beginning of the list on the Expo Display, when all Prep Stations have marked the chit as Complete. This option only applies to Expo Displays. |
9 – Display Subtotal | This feature is only supported with DOM. |
10 – Do Not Display Voids | This feature is only supported with DOM. |
11 – Display Menu Item Count | This feature is only supported with DOM. |
12 – No Expo Done Before Paid | This feature is only supported with DOM. |
13 – Unconsolidate Items After Condiment Entry | Select this option to unconsolidate multiple quantities of menu items if condiments are selected for each item. This option only works when using DOM or when 1 – Enable KDS Consolidation is set for the order device. |
14 – Multiple Condiments Per Line | Select this option to display condiments in a continuous line on each order chit. Deselect this option to print each condiment on a separate line beneath the referenced menu item. To compress the condiments into a single line, you must not print condiments in red. |
15 – Display New Order Notification | This feature is not supported with DOM. |
16 – Expo Done Exempt | Select this option to prevent an Expo Station from marking a suborder as Done, when it is marked as Done on another Expo Station. |
17 – Print Course Header | Print Course Header on the KDS for for Dining Courses. |
18 – Do Not Consolidate | Select this option to print identical items separately if they are posted separately. Deselect this option to consolidate identical items onto one line, preceded by the quantity. Menu items with condiments do not consolidate. Options 7 – Sort by Seat and 1- Enable KDS Consolidation override this option. To disable consolidation, you must select this option and then deselect 1 – Enable KDS Consolidation The output format depends on the settings of 7 – Sort by Seat and 18 – Do Not Consolidate. |
19 – No Prep Done Before Paid | This feature is only supported with DOM. |
20 – Show Previous Course Indicator | KDS Configuration for Dining Courses. |
21 – Disable Double Touch Bump | Select this option to prevent KDS users from bumping an order by touching a chit twice on the display. |
22 – Match Voids with Order Chits | Select this option to have voided order chits appear directly in front of the order it relates to. |
23 – Sort by Print Group | Select this option to sort menu items based on the print group. If a print group is not assigned, items print according to their record number. Option 7 – Sort by Seat overrides this option. |
24 – Print Check on Expo Done | Select this option to automatically print the guest check once the corresponding chit is marked complete on the Expo Display. |
25 – Alerts Exclude Prep Time | Select this option to exclude menu item prep times from alert time calculations. |
26 – Bump Marked Items | Select this option to allow KDS users to bump marked items and orders from this display. If option 12 – No Expo Done Before Paid or 19 – No Prep Done Before Paid is also selected, KDS users cannot bump marked items or orders until the check is paid. |
27 – Suppress Check Total | This feature is only supported with DOM. |
28 – Use Deli Chit Format for Runner Chits | Select this option to override the traditional runner chit layout with the deli chit layout, which prominently shows the order number. |
29 – Item Print on Item All Prep Done | Select this option to allow runner chit printers to print a chit for each individual item by order type. The chit prints when the cook bumps the item from the KDS Display. If the item routes to multiple Prep Stations, the runner chit prints when it is bumped from the last KDS station. If runner chit printers are assigned by the KDS order device, chits print to the runner chit printer assigned to the last KDS the item was bumped from. You must also enable Order Types Parameters option 9 – KDS Allow Item Print on Item All Prep Done for this feature to work. This feature is only supported on Prep Stations. |
30 – Suppress Guest Check ID on Runner Chits | Select this option to prevent the guest check ID from appearing on runner chits printed from this order device. When selected, the guest check number prints on the runner chits instead of the check ID. |
31 – Always Show Quantity | Select this option to show the quantity for every condiment ordered, even if the quantity is 1. When set, condiments must be added to the check singly, that is, without using the on screen numeric key pad for multiple condiment orders. You must deselect option 1 – Enable KDS Consolidation for this feature to work. When deselected, the quantity is implied from the item preceding it on the order chit. This feature is not supported with DOM. |
Configuring CAL Packages for KDS
In order for the KDS to function properly, we also have to deploy some CAL packages:
- KDS Handler – for the workstations hosting the KDS Controller
- WS KDS Display – to the entire Property (when using Win32 Based Displays)
- or Simphony KDS Client – to the entire Property (when using CE-based RDCs)
You can find Cal packages only at the Enterprise level, under the Setup tab -> Cal Packages.

Select the KDS Handle Cal Package, go to the Deployment Tab, and Add a new Deployment.
This is important! For the Deployment type, select Specific Service Host, and then select the Workstation hosting the Primary KDS Controller and do the same for the backup controller.
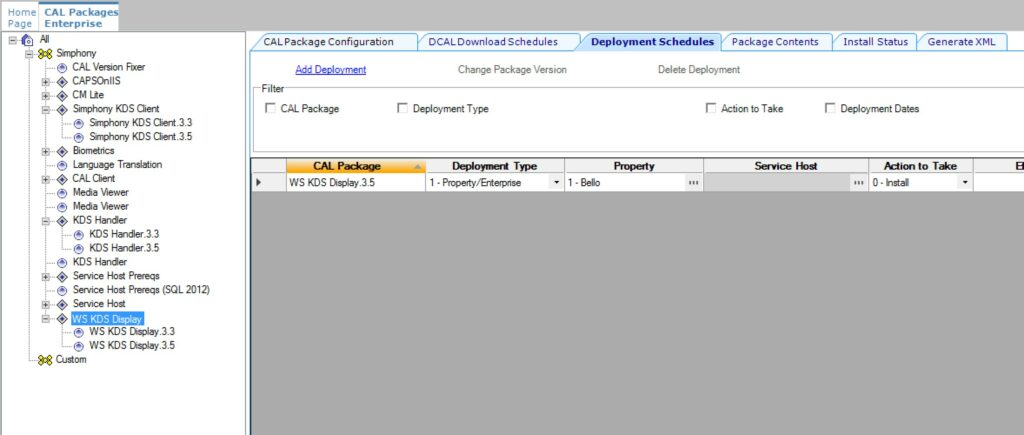
The WS KDS Display can be deployed to the entire Property.
IMPORTANT NOTE: Deploying CAL Packages will cause the workstations to download, install and reboot, which will make the device unusable for a while. Only do this when the restaurant is closed!
If you are looking for comprehensive Simphony Training, we have a complete online course and support platform. More details below.
KDS Configuration in EMC
I hope you enjoyed my article on how to configure your KDS in EMC and that you find it useful when you implement and make changes in your Simphony POS.
- Do you have any questions regarding KDS?
- Do you currently use a KDS in your Restaurant?
- How many KDS screens do you have programmed in your system?
- Let me know in the comments below!

17 thoughts on “Configure your KDS (Kitchen Display System) in EMC”
Hi, Thank you for the tutorial,
I have a question regarding pulling new configurations from EMC down to the kds.
I changed around layouts etc, but they didnt appear on the kds until I restarted the service host of the kds controller.
I tried doing a database reload, a refresh and update, restarting the kds service on the workstation hosting the kds controller, and I also even tried restarting the kds itself yet nothing changed until I restarted the controller. Is there a way to pull new configurations without having to go through a restart of the actual workstations.
thank you for reading,
Kris
Hello,
The changes will happen automatically with the update period set in EMC. If you want to make the changes faster, you can manually update the KDS controller and then wait, the screens should update shortly after.
Thank you Michael for the quick response. What does manually updating the KDS controller involve? is this just clicking update at the sign in screens of the workstation?
Yes, on the workstation that hosts the KDS controller.
Hi Michael In the case where an order has already gone into kds, when the chef is finished order and sending the ticket to another kds, they call it Expo station and Prep station?
I don’t think the KDS’s can be programmed to be used like that.
Typically, when an order comes to the kitchen, all KDS get the order.
The Expediter received the entire order to see the whole ticket – Expo KDS
The Prep Stations, like Grill, Pasta Pizza get only their own menu items – Prep KDS.
When the food is ready, the Prep bumps the ticket, which notifies the Expo KDS that items is done.
When the Expo bumps the ticket, it means the runner picked it up and left the kitchen. This action also bumps the ticket from all Prep KDS if they forgot to do it.
The Expo KDS should only “send”, or bump, the order to the customers, not prep stations.
Hi Michael,
we are working for a Fast Food Chain and we are using an Expeditor KDS which shows the whole Order summarized.
Is it possible to sort the Articles on a Chit by for Example Menu Item Classes (All Burger, All Fries, All Drinks underneath) ?
Thank you!
Yes. You should be able to define them separate by sorting the print group. There are also some option bits to group similar menu items in Menu Item classes.
I would need more details to provide a better answer.
Hi Michael,
How many Max RVCs one KDS control will support?
Thank you.
It really depends on performance of the controller and number of orders.
If you start having lag or issues upgrade the controller to a stronger workstation or server.
Hello Micheal, excellent material.
I have a challenge.
I have 2 KDS, 1 Prep and another Expo.
And I have the courses configured
Entry
Main
Dessert
When I send an order with 1 item from each Course, KDS Prep actually receives only the ENTRY, and only the MAIN appears when I release the entry.
However, the same thing happens with EXPO, only the MAIN item appears when I release the entry in PREP. Is there a way so that when I enter everything, only the current course appears in Prep and everything appears in EXPO?
Is your expo Kds marked as EXPO in the configuration?
OK I may be missing something easy but, im doing my first KDS. Does it require a workstation entry too? when I do to cal the KDS screen even though it is programmed and has an IP it does NOT appear as an option.
my kitchen thems no longer works and does not send to the second kitchen
Did you make any recent changes? We need some more details.
Hi there,
I´m in the learning process of how fast food restaurants are set. The company I work for , is currently migrating to simphony, but as they were explaining to me how the cashier works, they mentioned they need one printer per kds, is that correct? to me sounds like it defies the purpose of saving paper.
Yes, we have a full Cash Management module in the course.