
What is a Micros Workstation?
A workstation is a device used by servers, bartenders, and cashiers to perform different restaurant tasks, such as starting checks, entering menu items, giving discounts, and taking payment.
Oracle Hospitality (1) has several types of workstations, from larger, desk-mounted devices, to small portable tablets.
The workstations Micros currently uses are:
- Workstations 6-Series
- Workstations 3-Series
- Tablet 7-Series
Have more questions? We have a fantastic Facebook community of like-minded individuals that can answer them all! Join for free below!
Adding a new Workstation in EMC
In order to add a new workstation in EMC, we must first ensure that we have a license available for it. To check the number of licenses you have available, check Enterprise Configuration -> License Configuration.
Next, we will go to the property level and open the workstations tab. Workstations can only be found at the property level, so don’t try to open them at the RVC or zone level.
1. Insert a new record

Use the Insert key in the top bar to add a new Workstation, and select an object number and a name. You can also use a template to make the process faster.
Workstation names must include letters, they cannot only be numbers. A combination of letters and numbers is recommended.
2. Configure the General Tab
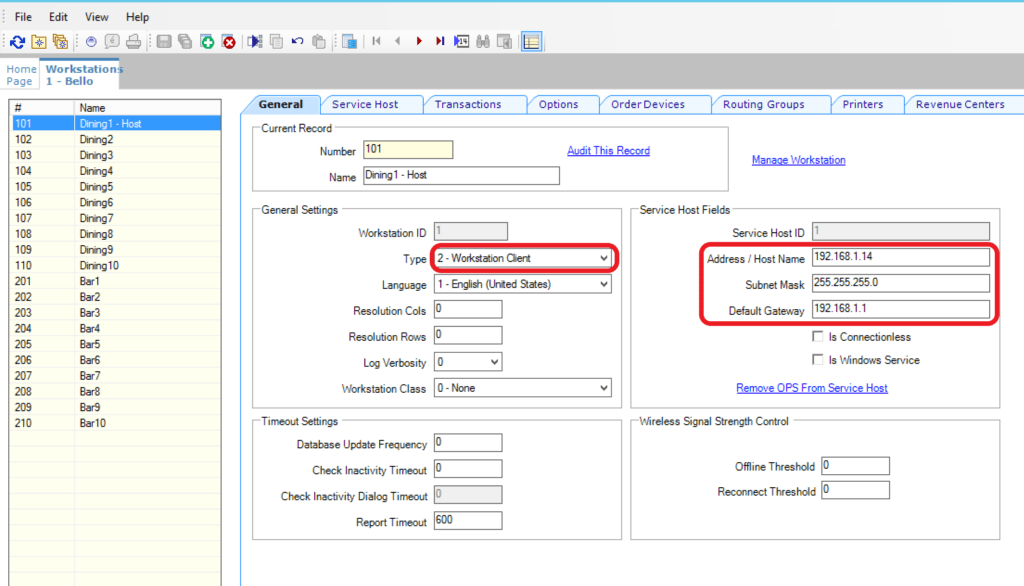
The general tab contains sever fields to configure, but the most important ones are workstation type and connection information, where you need to add the IP address, subnet mask, and gateway.
Let’s explore all the fields and see what each one does.
| Field | Description |
|---|---|
Type | Select the type of workstation from the drop-down list:
|
Language | Select the default language of the workstation. This is the language that appears on the workstation’s Sign On screen. If an employee has a different default language set, the employee sees their default language after signing in to the workstation. |
Resolution Cols | Enter the number of Resolution Columns for the workstation’s display. The default value is zero, the workstation will adjust based on the size of the screen. Use this only for special cases. |
Resolution Rows | Enter the number of Resolution Rows for the workstation’s display. The default value is zero, the workstation will adjust based on the size of the screen. Use this only for special cases. |
Log Verbosity | Select the logging verbosity for the workstation. Select zero for minimal logging. Higher log verbosity provides more information in the log file, which is helpful in troubleshooting issues. Use higher verbosity only temporarily, for testing purposes. For regular operations, keep at zero. |
(Optional) Workstation Class | Select a Workstation Class to allow similar workstations to be grouped together and to share certain page configuration settings. |
Database Update Frequency | Enter the number of seconds for the workstation to receive changes. The default value is 1800 seconds (30 minutes). The value in this field overrides the Property Parameter’s Database Update Frequency setting. |
Check Inactivity Timeout | Enter the number of seconds before the workstation shows the message (Do you need more time?), prompting the workstation operator to cancel the transaction. When you enter 0 (zero), the message does not appear. When you select Enable Follow Me from the RVC Parameters module, the check is automatically suspended rather than canceled. |
Check Inactivity Dialog Timeout | Enter the number of seconds that the workstation shows the Inactivity dialog before automatically canceling the transaction. This field is unavailable when you set the Check Inactivity Timeout value to 0 (zero). |
Report Timeout | Enter the number of seconds the workstation waits for a response before showing a communication failure notice. |
Address / Host Name | Enter the IP address or host name of the Oracle MICROS Simphony Service Host where the workstation application runs. |
Subnet Mask | Enter the subnet mask of the Service Host where the workstation application runs. |
Default Gateway | Enter the default gateway of the Service Host where the workstation application runs. |
Is Connectionless | Select this option to have the Service Host open and close a new connection for each web service call. This prevents the workstation from reaching the maximum number of web connections allowed, although the connection becomes slightly slower. |
Is Windows Service | Select this option to allow the Service Host to start as a Windows service. The Service Host service starts on Microsoft Windows startup with other Microsoft Windows services. The POS client starts only when the workstation operator signs on to the operating system. If you select this option, you need to change the ports of the services being run (for example, Check and Posting Service (CAPS) and Oracle MICROS Simphony Kitchen Display System (KDS) Controller) in addition to the POS client. Use the EMC modules to change the ports. If a non-POS client is required to run on the Service Host, it must run on a different port than the workstation port. You can also set the Service Host to run as a Microsoft Windows service from the Service Host module (rather than from the Workstations module). If you set this option in the Service Host module, you do not need to change the ports of the services being run as the device is not intended to run the POS client. |
3. Service Host Tab
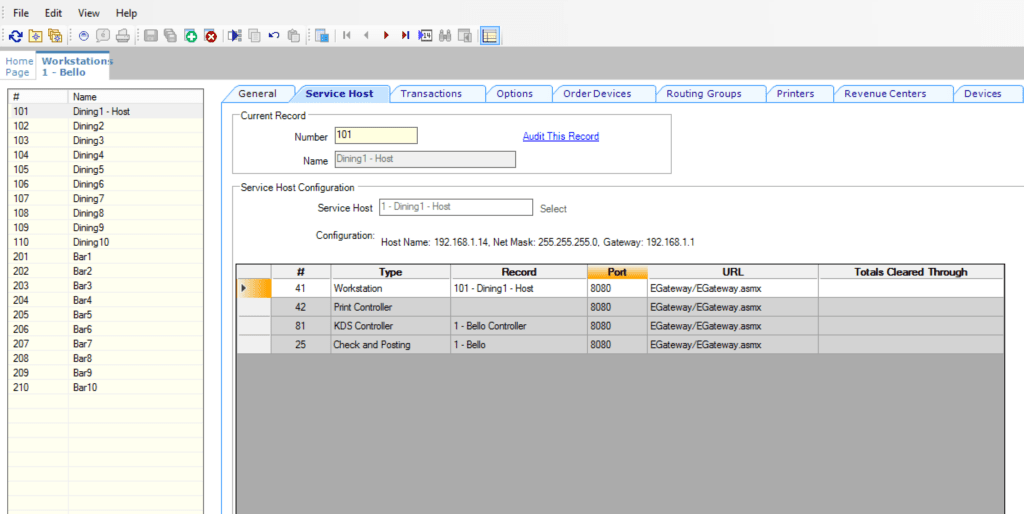
The service host tab will show what services are assigned to each Micros workstation. All of them will have the Workstation and Print Controller service. Additionally, you can add Check and Posting (CAPS), KDS Controller, KDS Back-up, D-CAL, and more.
It’s recommended that you spread the different services to several workstations for load balancing and to avoid a single point of failure.
4. Configure the Transactions Tab
In the Transactions tab, we can configure the minimum and maximum check number, default order type, and the number of cash drawers.
Related Article: Guest Checks in Micros Simphony.
Each Micros workstation can support up to two Cash Drawers. After making changes to this setting, make sure to update and restart the workstation for everything to take effect.
| Field | Description |
|---|---|
Minimum Check Number | Enter the minimum guest check number to use:
|
Maximum Check Number | Enter the maximum guest check number to use:
|
(Optional) Default Order Type | Select the default active order type for the workstation (for example, Dine In, Take Out, or Drive Thru). |
Barcode Format Set | Select the barcode format for the workstation to read barcodes of various lengths. |
Cashier Link | Select the cashier record to link to the workstation. This provides a link to tracking totals for Tender/Media information. This field is available only when you select 8 – On = Link Cashier Totals to WS; OFF = Link to Operator from the Workstations module (Optionstab, and then the Offline/Misc subtab). |
Merchant Group | Select the merchant group for the workstation, or select 0 – Use RVC Setting to use the settings from the revenue center in which the transaction occurs. If multiple revenue centers exist, each revenue center may route payment information to a different bank. These banks can be grouped into merchant groups. |
Thai Tax Rd Number | If applicable, enter the number to print on Thai Tax trailers. |
For more Free Content on other Simphony Hardware Modules, also check out our article on Hardware for Simphony.
5. Configure the Options Tab
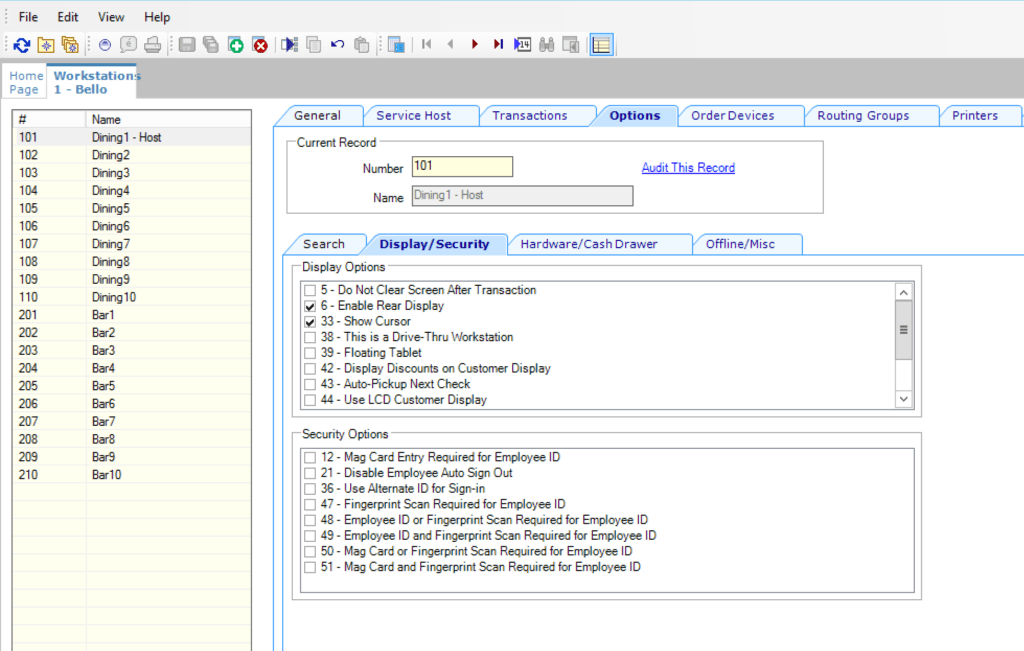
The options tab contains several options bits for Display/Security, Hardware, and Offline/Misc.
In the Display/Options, I have selected options bits 6 and 33 – Show Cursor. Only enable option bit 33 when using a server with a keyboard and mouse. Do not enable it for touchscreen workstations.
| Display Option | Description |
|---|---|
5 – Do Not Clear Screen After Transaction | Select this option to have the last screen of a transaction remain visible on the workstation display after the transaction is complete. |
6 – Enable Rear Display | Select this option to enable output to a rear customer display that is attached to the workstation. |
33 – Show Cursor | Select this option to show the mouse cursor for this workstation when workstations are installed on PCs (such as a host/hostess desk). This option is usually disabled for Workstation 6 and other Oracle MICROS hardware platforms. |
39 – Floating Tablet | Select this option for an Oracle tablet that is not docked to a base station. When enabled, the tablet cannot configure or use the majority of the hardware devices that traditional workstations support. |
42 – Display Discounts on Customer Display | Select this option to show discount totals and amount due on the second line of the customer display. Deselect this option to show only the amount due. |
43 – Auto-Pickup Next Check | In a drive-through environment, select this option to allow the Payment Window workstation to automatically pick up the oldest open check (that has this workstation’s order type) as soon as the current check is paid. When no checks are open, the workstation prompts to check again or to exit the Auto-Pickup functionality. This option is intended for drive-through environments that have an Ordering Window and a Payment Window. |
44 – Use LCD Customer Display | Select this option to use an LCD customer display. Deselect this option to use a pole display. This option is dimmed when 6 – Enable Rear Display is deselected. |
52 – Do not display currency symbol on rear/customer display | Select this option to suppress the currency symbol appearance on the rear customer display. |
53 – Display non-rounded amounts on rear/customer display | Select this option to show a non-rounded value for the total amount due on a rear customer display. You must also select 4 – Round Currency in the Currency Parameters module. |
54 – Display Change to dispense in Bills in the Change due dialog | Select this option to show the Change to Dispense in bills in the Change Due dialog. This lets workstation operators easily determine the change due in bills while the coin dispenser dispenses the rest of the amount. |
61 – Always Hide Frame | Select this option to hide the POS Operations window frame when the POS Operations UI is not in full-screen mode. |
62 – Prompt for Destination Printer when docked | Select this option to have the workstation prompt for a Destination Printer (if configured) when docked. |
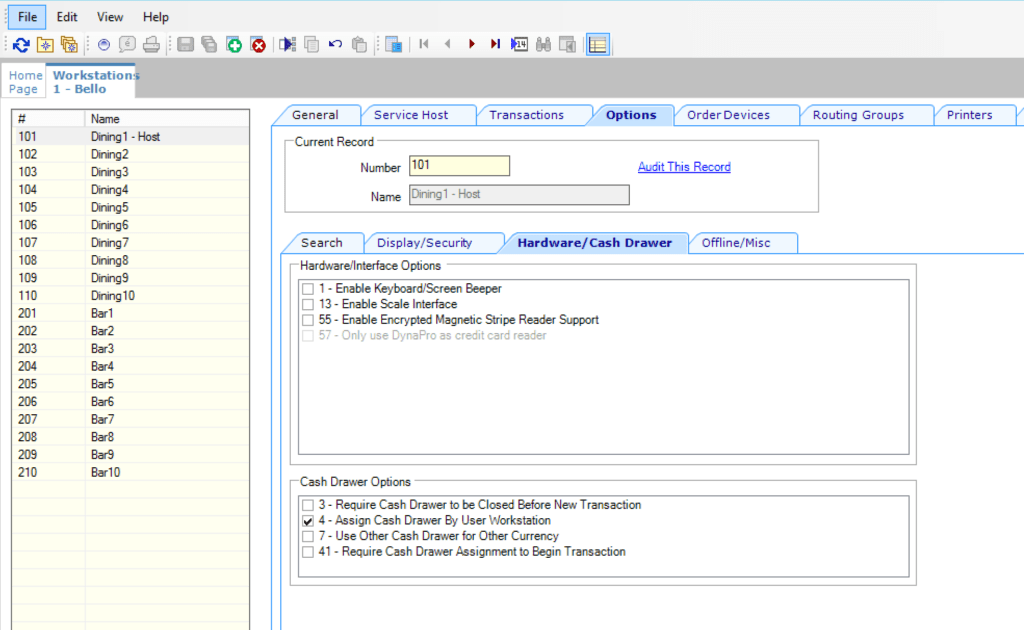
In the Hardware/Cash Drawer tab, I selected only option 4.
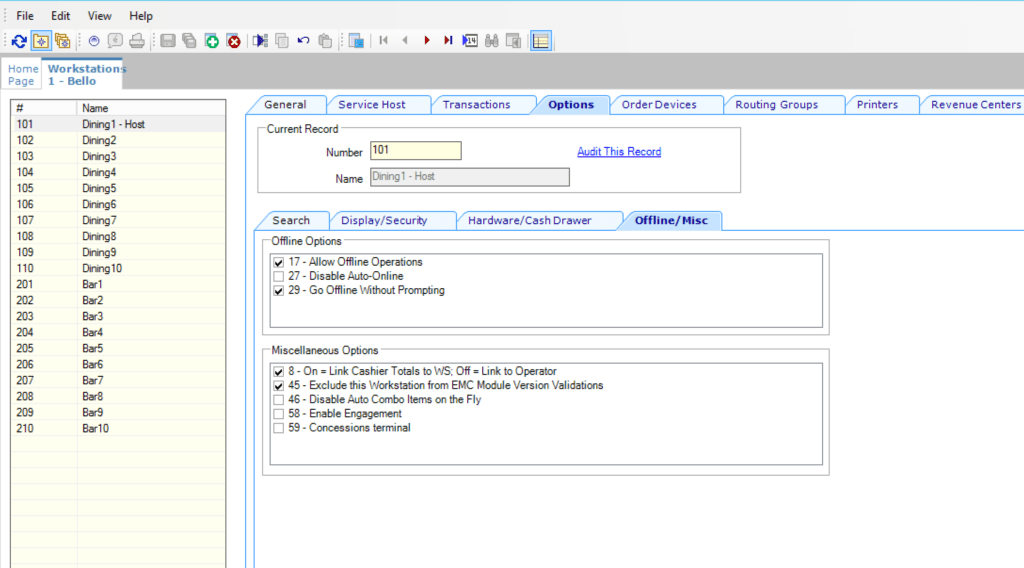
In the Offline/Misc tab, I selected Option Bits 17, 29, 8, and 45.
6. Configure the Order Devices Tab
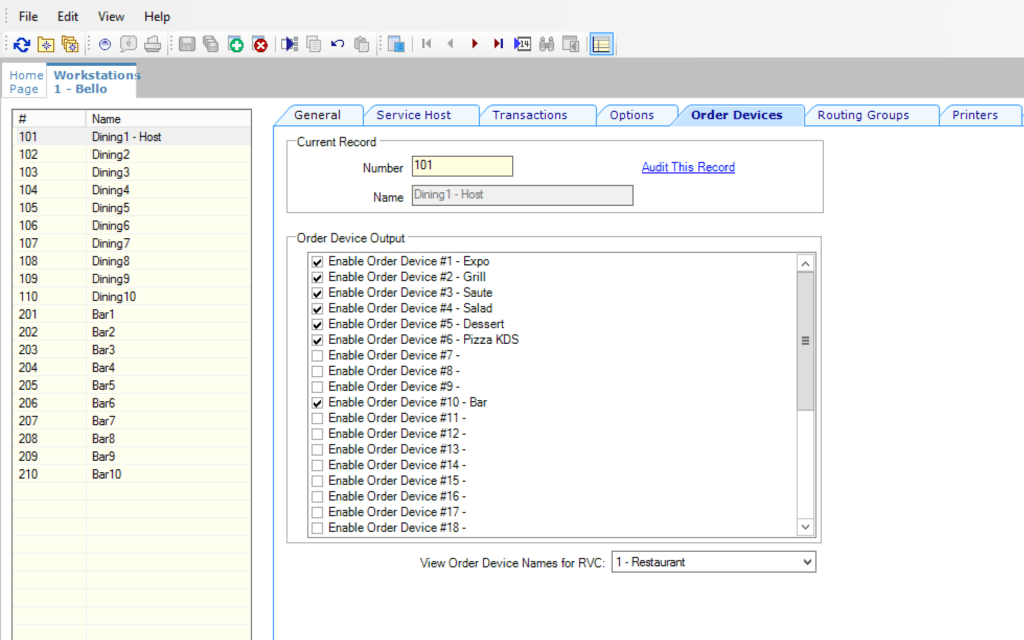
In the Order Devices tab, we will enable all the printers that are allowed to be used by this workstation. Typically all the active printers must be selected in order for receipts to be sent to the kitchen and bar.
7. Configure the Printers Tab
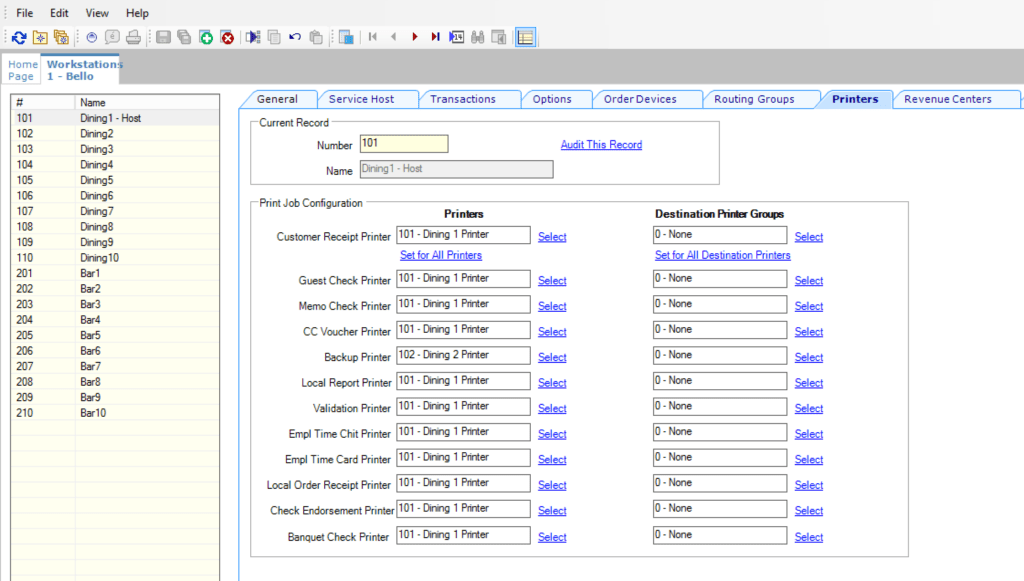
In the printers (2) tab, select the local printer responsible for printing checks, reports, time cards, and more. Usually, all these are assigned to the local printer, with the exception of the backup.
8. Configure the Revenue Centers Tab
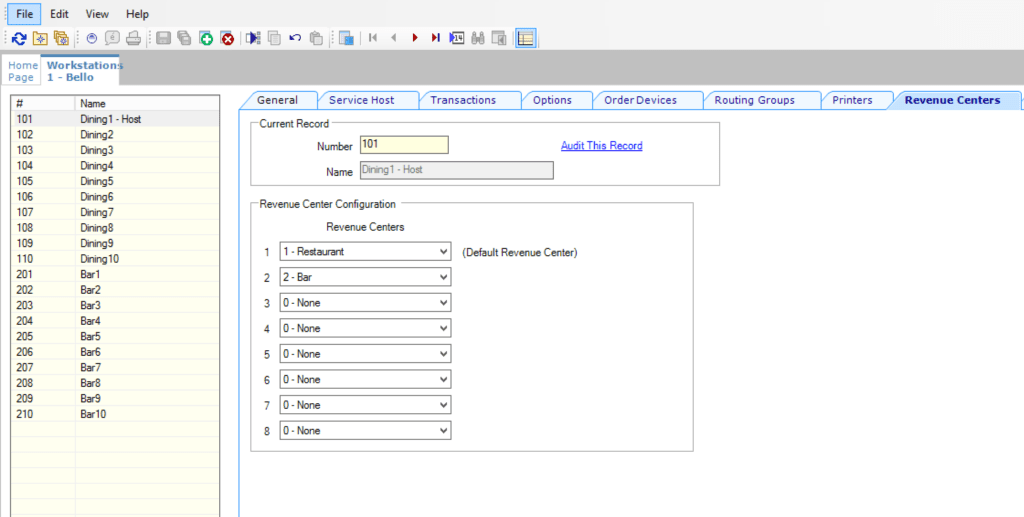
Each Micros workstation needs to have a Default Revenue Center assigned. Additionally, add all the other RVCs that this workstation is allowed to use. If you make any changes to this module, update and restart the workstation after.
9. Configure the Devices Tab
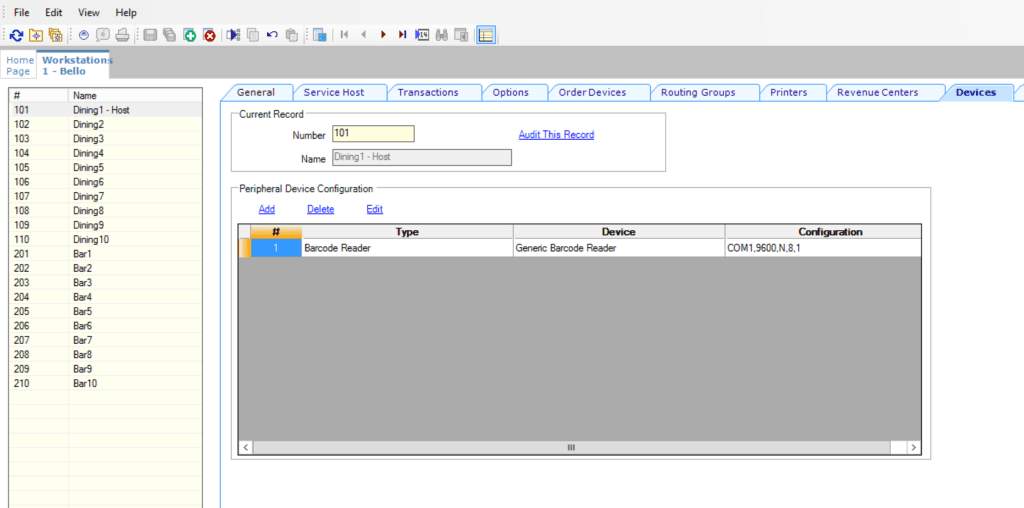
Each Micros workstation has default peripherals that it accepts automatically, such as printers and cash drawers.
But for all other external devices, such as scales and scanners, you will need to add them all in the devices tab. Update and restart the workstation after that.
The last tab in the Workstations module is the Log. If you generate any log at the workstation, you can download it from here. It’s a really easy way to do it, so you don’t have to try and read it on the workstation or get a USB drive to transfer it.
After adding the Workstation in EMC, you can proceed with setting it up on the physical hardware using CAL (Client Application Loader).
If you are looking for comprehensive Simphony Training, we have a complete online course and support platform. More details below.
Workstation Configuration for Micros Simphony
I hope you enjoyed my article on how to configure your Micros Workstation (3) in EMC. Do you have any questions about setting up your workstation?
- How many Workstations does your restaurant use?
- Do you have any external devices?
- Let me know in the comments below!

14 thoughts on “Micros Workstation Configuration”
Dear Michael,
I have installed the EMC module of simphony. I can download and run the CAL client on the windows server. I can fill the name, url and server name in the CAL client. On the next screen I tried to login with the EMC user name and password but I got “Valid credentials are required!” error message.
Should I use other user? Or should I link the workstation and user in the EMC?
Thank you
Try another user, and check your Role as well.
hi, my question is.
how can I configured the workstation to work strictly wireless on wifi mode? I have Micros workstation 3. it usually saids online connected to the wifi but under Caps:off and then when I log in it asked if I want to work offline. any help would be greatly appropriate it
Yes, the WS can run on WiFi. I think you might have a problem with the local routing. The WiFi network might be segregated from the local network. It makes sense for security reasons, but it can’t contact CAPS.
As your IT team to see if they can check if the WiFi allows routing to the Local WS network on Port 8080.
Dumb question. But on a windows 11 device running Micros simphony cloud service… how do you exit out of the screensaver and into windows?
thanks!
You should be able to swipe up.
Also, disable screen save for Workstations.
how to install new WS with existing IP address. can you explain step by step pls.
I’m not sure I understand the questions related to the existing IP address. Is it already in use? That won’t work, you will get a conflict on the network.
Hello Michael
I run the Micros client setup and it searches for Cal Server? but doesn’t find one. Is there a service that’s possibly not running that’s causing the new client not to find the server during setup?
You can try to enter the IP address of the CAL server manually. Sometimes the network can block auto-discovery.
Dear Michael. We are using the Workstation 8 series terminal. We recently received the Modular MSR for swiping with a Micros card.
Following the user guide, no Simphony configuration is needed.
https://docs.oracle.com/en/industries/food-beverage/micros-workstation-8/weset/t_setup_modular_msr.htm
Are you maybe familiar with this issue?
Are the workstations not reacting when you swipe a card? What version of Simphony are you using?
Secondly, also the use of secure RFID login for users.
https://docs.oracle.com/en/industries/food-beverage/micros-workstation-8/weset/c_basic_features.htm
We can’t seem to get this to work.
It might be a version problem.