
What is the Distribution Function in Micros Simphony?
In essence, the Distribution function in EMC is used to copy information between properties and revenue centers. When managing multiple properties, revenue centers, and even multiple enterprises, the distribution function can help you save time and avoid mistakes.
Most common uses of the distribute function:
- Cloning Properties, a super simple way to add new locations
- Cloning Revenue Centers
- Copying information from one property to the other: Workstations, Printers, KDS, etc.
- Copying information between revenue centers: Order Devices, Serving Periods, Time Periods, etc.
- Copying Menu Items from one location to the other
- Copying entire pages in Page Design from one location to another. Pages are notoriously difficult to copy and transfer dues to their complexity, so the distribution function is a lifesaver here.
- Remote distribution. Using this function, we can copy data between multiple Simphony systems. This is extremely powerful when setting up new enterprises, and it can save you days of work.
- Setting up new menus and configuration in a test lab and remotely distributing the changes to the production environment once everything is tested.
Need help with your Micros Simphopny system? We have a fantastic Facebook community of like-minded individuals that can answer all your questions! Join for free below!
Distribution Privileges
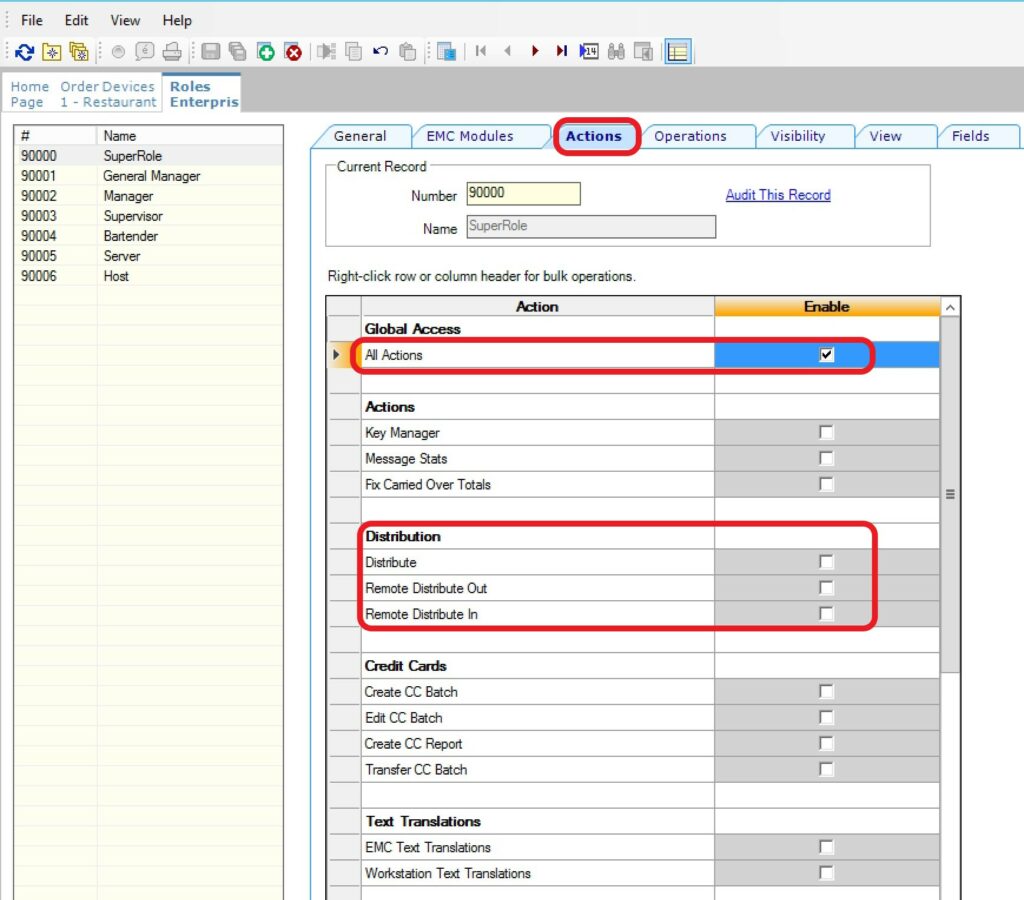
Before we get started with distribution, we have to ensure we have all the privileges needed in Roles. If you need to use the distribution function, you should have the highest role in your enterprise: property expert or super role.
At the enterprise level, open the Roles tab. In the actions section, you need to the Distribute, Remote Distribute Out, and Remote Distribute In selected. Alternatively, you can have the “All action” check box selected, which will give you access to everything.
| Privilege Name | Allows the Employee to … |
|---|---|
Distribute | Use the EMC Distribute function. |
Remote Distribute Out | Move data from one revenue center to another revenue center or from one property to another property between two different Simphony systems. Select this option to allow employees associated with this role to remotely distribute from this Simphony system out to another Simphony system. Employees need login credentials with permissions on the receiving Simphony system to Remote Distribute In. |
Remote Distribute In | Move data from one revenue center to another revenue center or from one property to another property between two different Simphony systems. Select this option to allow employees associated with this role to remote distribute from another Simphony system into this Simphony system. Employees need Remote Distribute Out permissions on the other system to distribute in. |
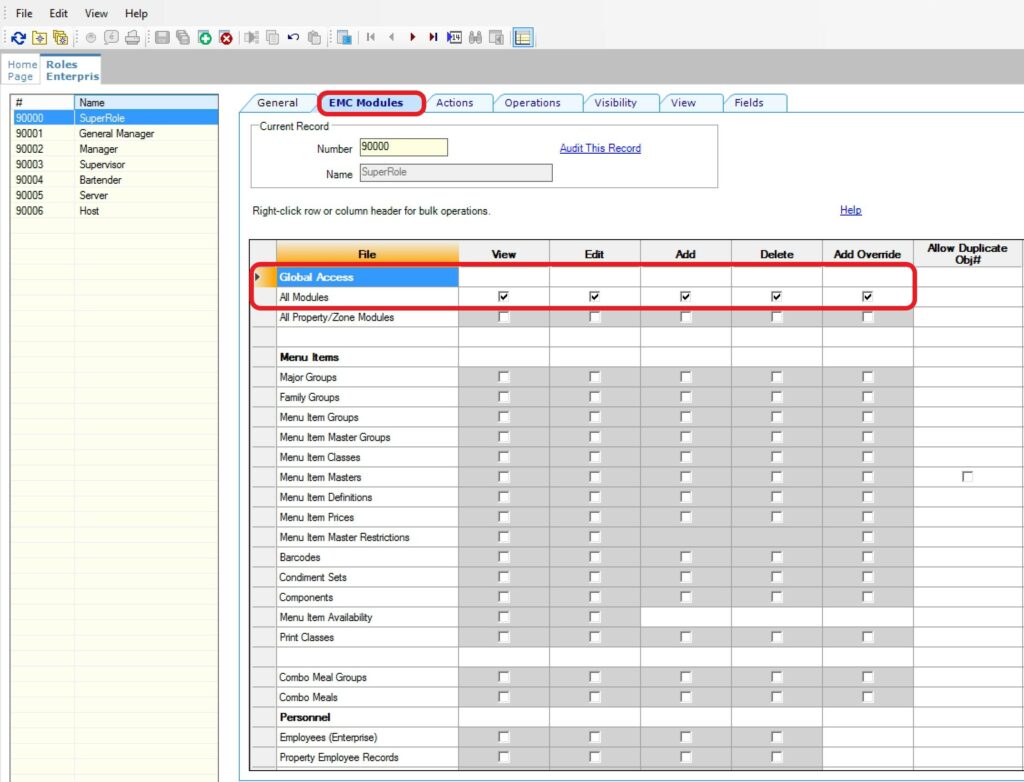
Besides having access to the Distribution function itself, you must also ensure you have access to all the needed EMC modules to view, edit, add, delete, and add override.
Either select all the modules one by one or select the “All modules” box at the top to get global access.
Adding New Properties using Distribution
If you have standardized restaurants with similar menus and operations, adding new locations is extremely easy using the distribution function.
At the enterprise level, select the Properties module. Click the Insert key to add a new Property.
We will use the distribution functionality to copy over as much information as possible in order to save time configuring the new location.
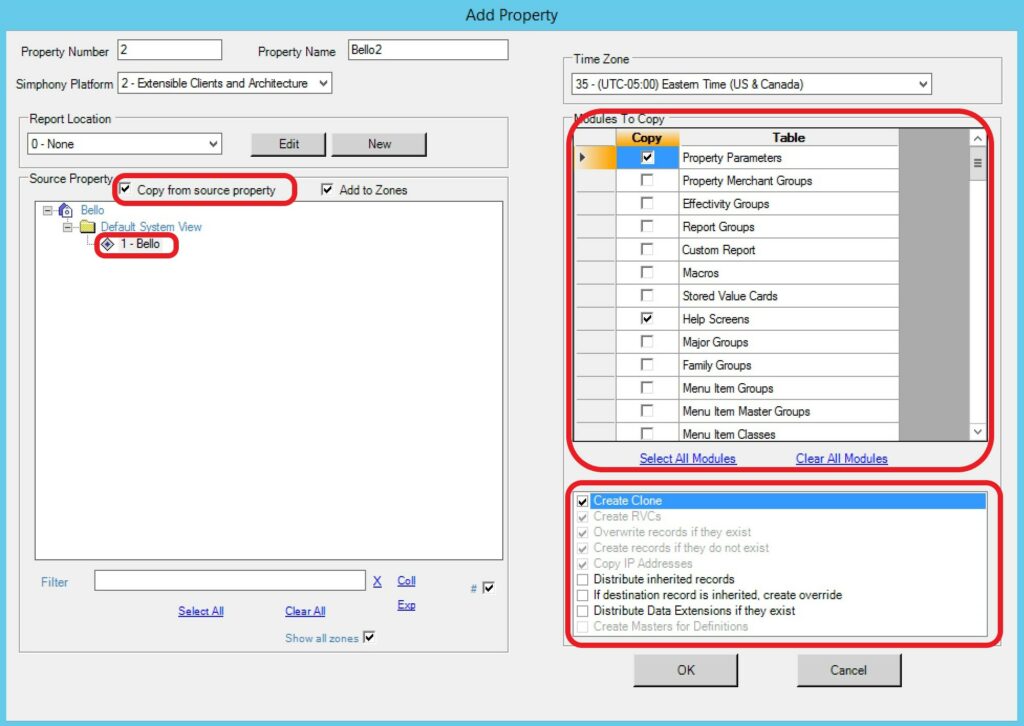
First, enter the new property number, name, and reporting location.
Next, select the “Copy from source property” check box, and select your existing property.
On the right side of the window, you will find all the “Modules to Copy” list. Select all the items that will be the same or very similar in the new property. Please note that modules defined at the enterprise level will be inherited automatically and do not need to be copied during this step.
Finally, in the options bits area, you can choose to create a clone, where all the existing information will be copied over, including workstation names, IP addresses, and configurations.
You can also copy all the revenue centers if they are identical. If not, I will show you how to distribute only some of them in the next step.
Once you have selected all the options needed, simply click ok and wait for the creation process to finish. This can take some time due to the large amount of information being copied, so please be patient and don’t try to cancel.
| Option | Description | Property | RVC |
|---|---|---|---|
Create Clone | Select this option to copy IP addresses of workstations and KDS displays and to distribute all revenue centers and create new revenue centers. Selecting this option also enables the Distribute RVCs and Copy IP Addresses options. | Yes | No |
Distribute RVCs | Select this option to distribute revenue centers, including all modules, in addition to distributing the selected modules for the property, if revenue centers exist in both properties. Existing records are overwritten and new records are created. Selecting Create Clone automatically enables this option. | Yes | No |
Create RVCs | If remote distributing, select this option to create revenue centers in the destination properties, if they do not exist. This option only becomes active when you select Distribute RVC. | Yes | No |
Copy IP Addresses | Select this option to copy IP addresses of the source record to the destination record. This option applies only to modules where the records include an IP address (for example, workstations and KDS displays). Selecting Create Clone automatically enables this option. | Yes | No |
Distribute inherited records | Select to distribute all records (defined and inherited) to the destination property. Deselect to distribute only records defined at the source property. | Yes | Yes |
If destination record is inherited, create override | Select to override inherited definition records in the destination property. Deselect to keep inherited records unchanged. | Yes | Yes |
Distribute Data Extension if they Exist | Select to distribute any existing data extension values. The source and destination data extension property record must match | Yes | Yes |
For more Free Content on other Simphony modules, also check out This Training Article.
Adding new Revenue Centers using Distribution
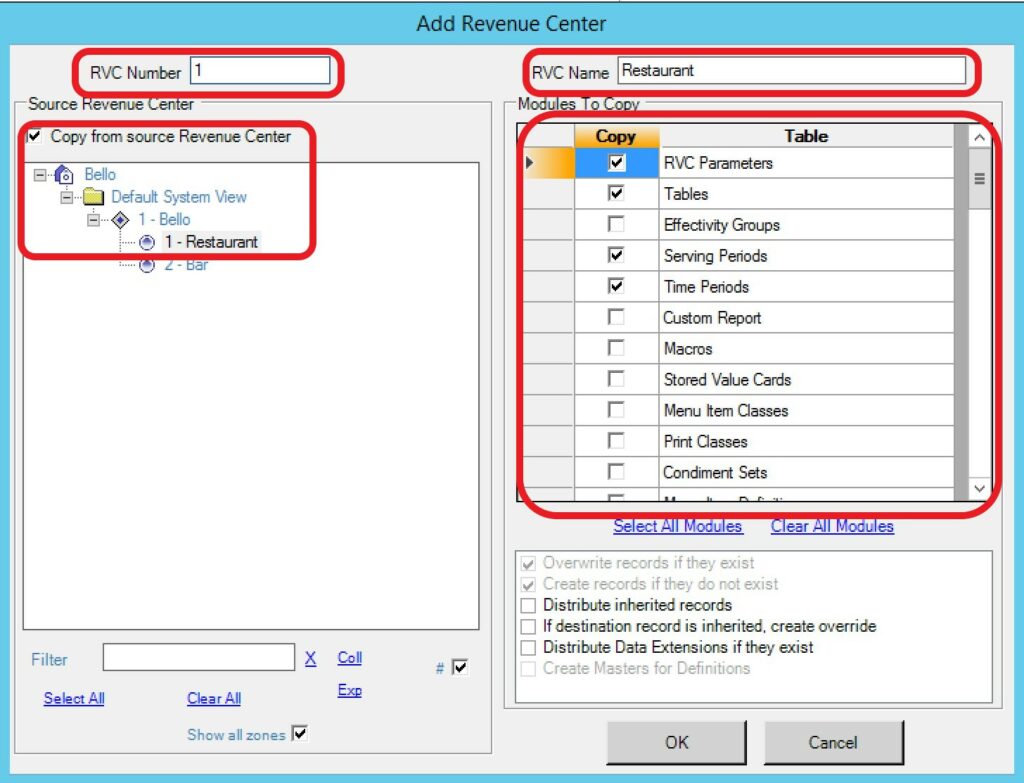
Copying Revenue Centers using the distribution function is very fast and efficient. At the property level, select RVC Configuration. Then click the insert key to add a new RVC.
Just like we did with a new property, we will first add a new RVC number and a name and select to copy from an existing Revenue Center.
On the right side, we can select which modules we would like to copy from the source RVC. Select all that apply, but keep in mind that modules that are inherited from the Enterprise or Property do not need to be copied.
Select any of the options bits that apply and then click ok to begin the process. It can take a few seconds, so be patient, and don’t try to do anything else in EMC while the process is running.
Using Distribution to Copy Property Level Data
Some of the most common items we copy at the property level are the hardware devices: Workstations, Printers, and KDS since they can only be found at the property level.
If your restaurants use the same number of workstations or very similar ones, then using distribution is the ideal way of copying the information, saving time, and ensuring standardization across the enterprise.
Even if the names or IP addresses are not identical, it’s much easier to adjust just a few fields rather than adding everything from scratch. So let’s take a look at how we would distribute workstations from one location to another:
First, select an existing property and open the Workstations tab.
Next, select the workstations you want to copy to the new Property by dragging the mouse cursor on the rectangle on the left side of the page.
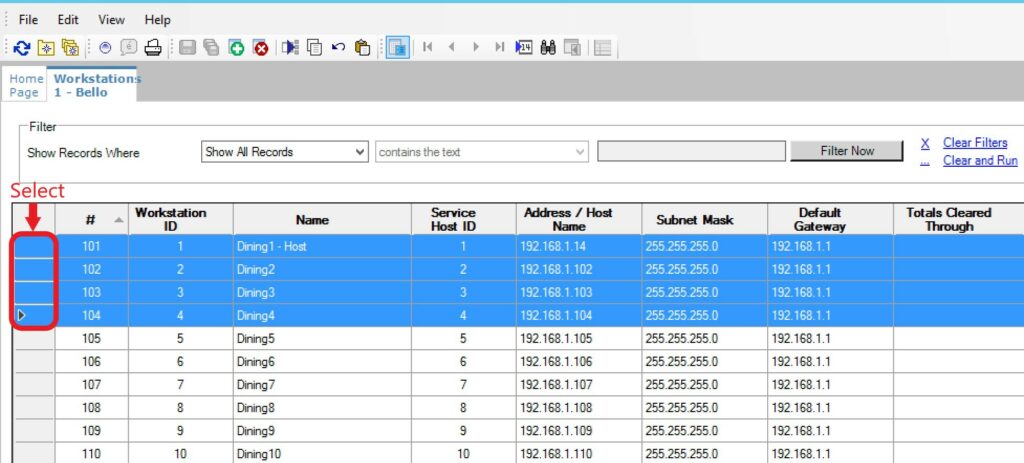
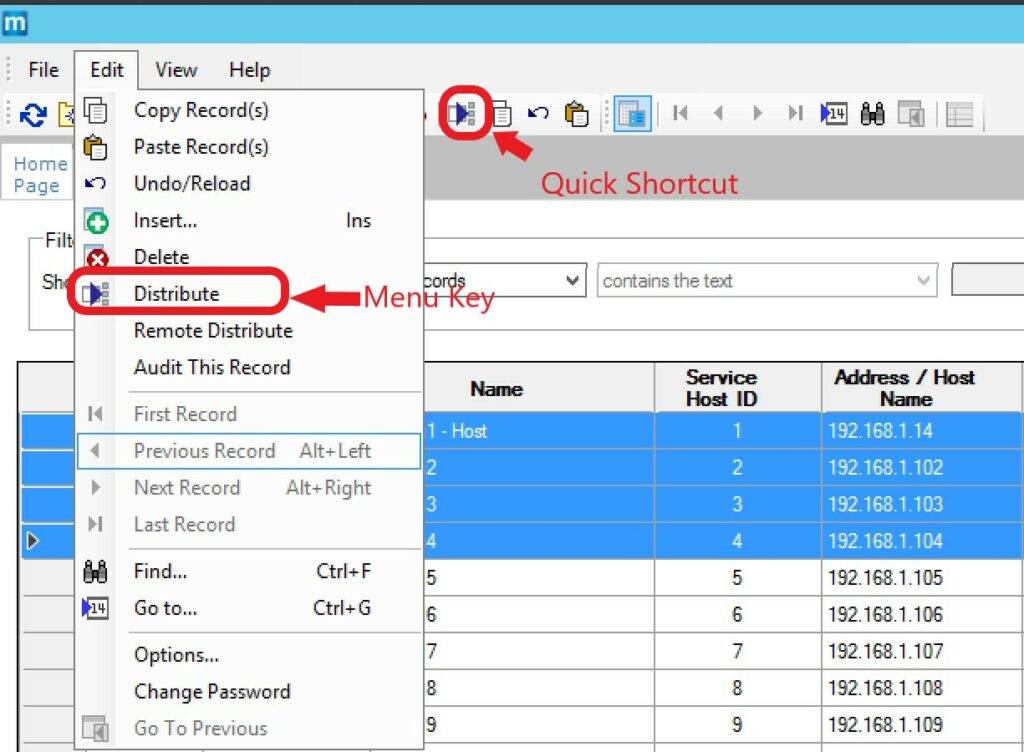
Once all the workstations you want to distribute are selected, click the distribution key. You can use the shortcut on the top bar, or you can use the menu: edit -> distribute.
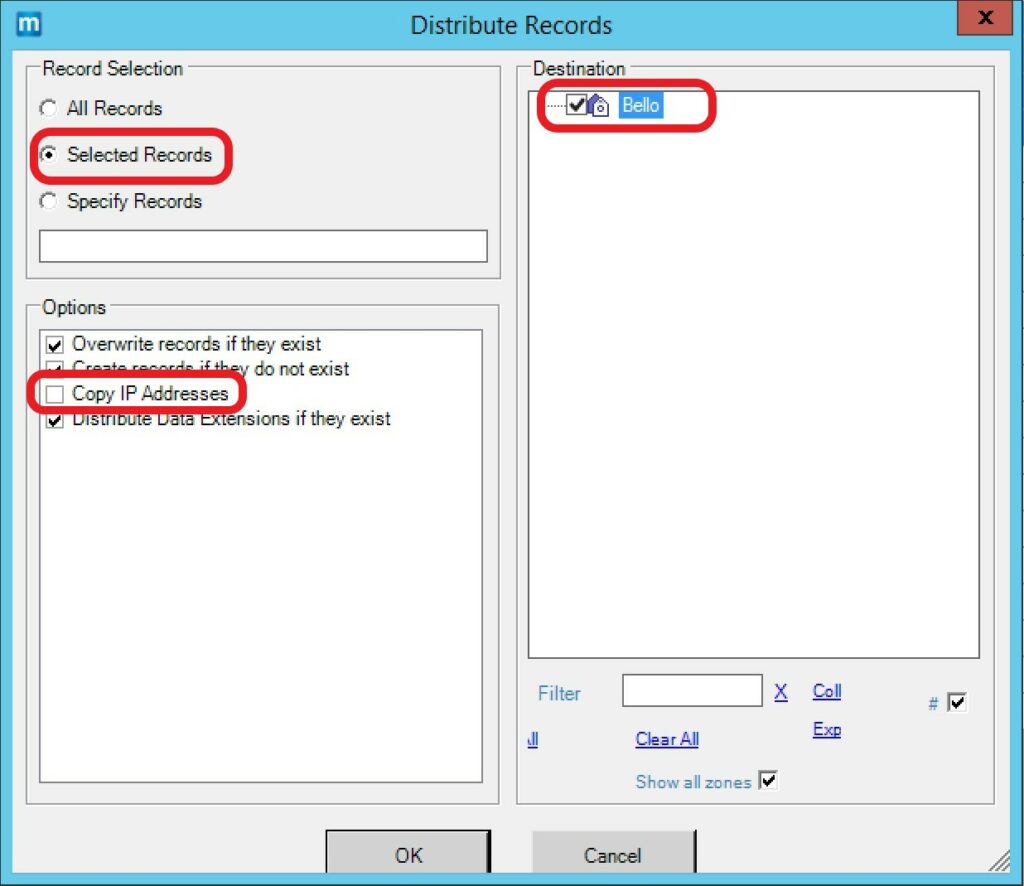
In the distribution window, ensure the record selection is set to “Selected Records”.
You can also choose to copy IP Addresses if you are using the same IP scheme in both propeties.
Select the Destination property on the right side and then click ok.
The same process applies to any other module you want to copy from one location to another, like Printers, KDS, and more.
If your menu items are defined at the property level, and you want to move some of them to another property, you can do so using the distribution key. This way, you ensure that the reporting will be accurate for the entire enterprise.
You can choose all three components of the menu item (master, definition, and price) or just some of them, which offers great control if your masters are defined at the enterprise level, and the definition and prices are only at the property level.
Using Distribution to Copy RVC Level Data
RVC-level data like the Order Devices, Serving Periods, and Time Periods can be easily copied by using the distribution key.
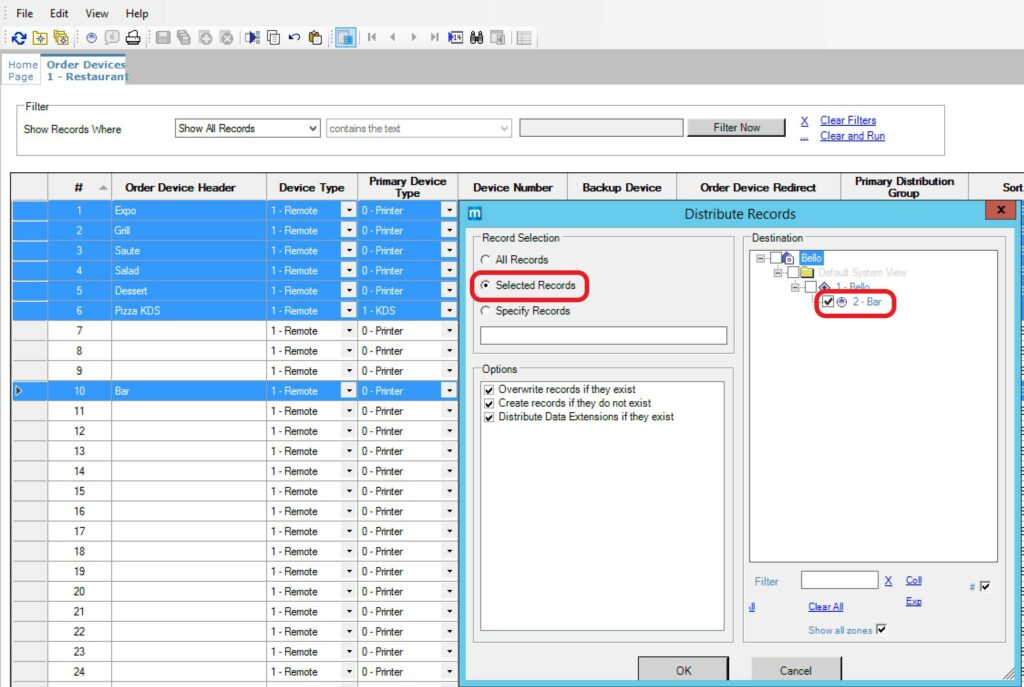
First, select the source RVC from where you want to copy the information and open the Order Devices module.
Select all the Order Devices that need to be copied and click the distribution key.
In the distribution window, ensure that you will copy only the selected record.
In the right side of the window, select the destination RVC, and click OK.
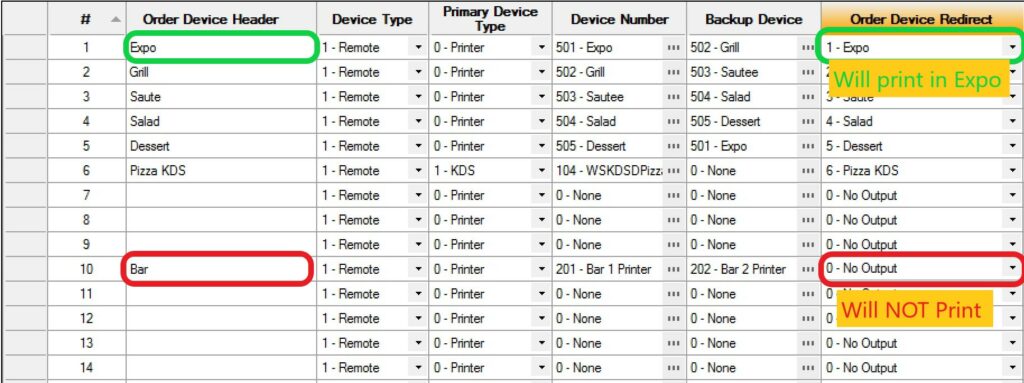
A quick note on order devices:
After adding or distributing a record, double-check the Order Device Redirect column.
In order for a printer to work properly it needs to redirect to itself or another printer. The “default” option is “No Output”, which will cause the printer to not print at all.
Remote Distribution between different systems
The distribution function becomes even more powerful when we can use it across different enterprises.
This can be used on a day-to-day basis if you have a test environment where you add new menu items or pages and then remotely distribute them to the production environment.
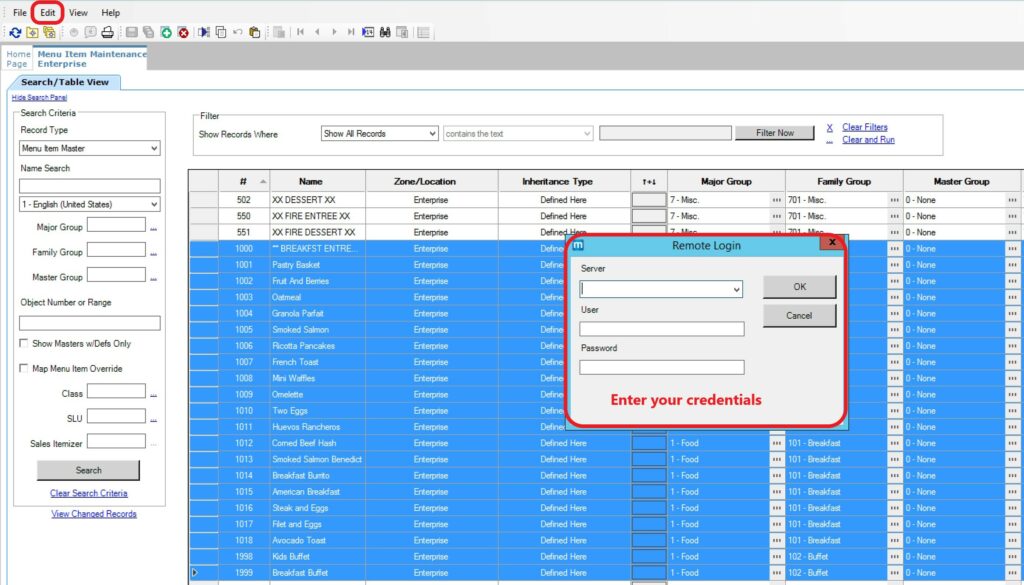
The remote distribution works exactly the same as the regular distribute key, there is just one extra step: you need to enter your credentials for the target EMC location, so the system knows where to send the configuration and also checks that you have to correct privileges.
You can find the remote distribution in the Menu under Edit -> Remote Distribute.
If you are looking for comprehensive Simphony Training, we have a complete online course and support platform. More details below.
Distribution Function in Micros Simphony
And that is it for my article on using the distribution function in Micros Simphony. If you have any questions or comments, please leave them in the comments below!
