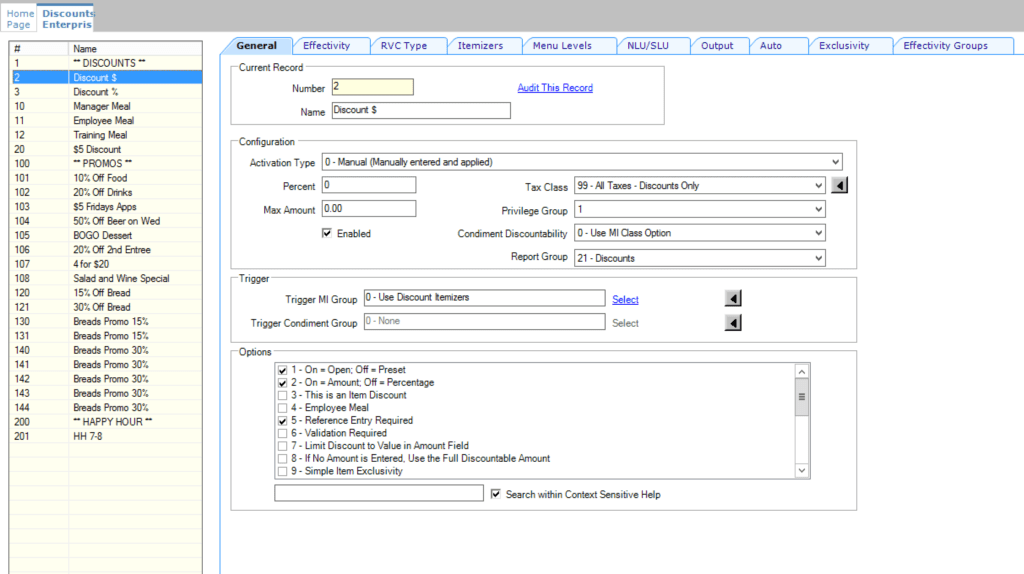
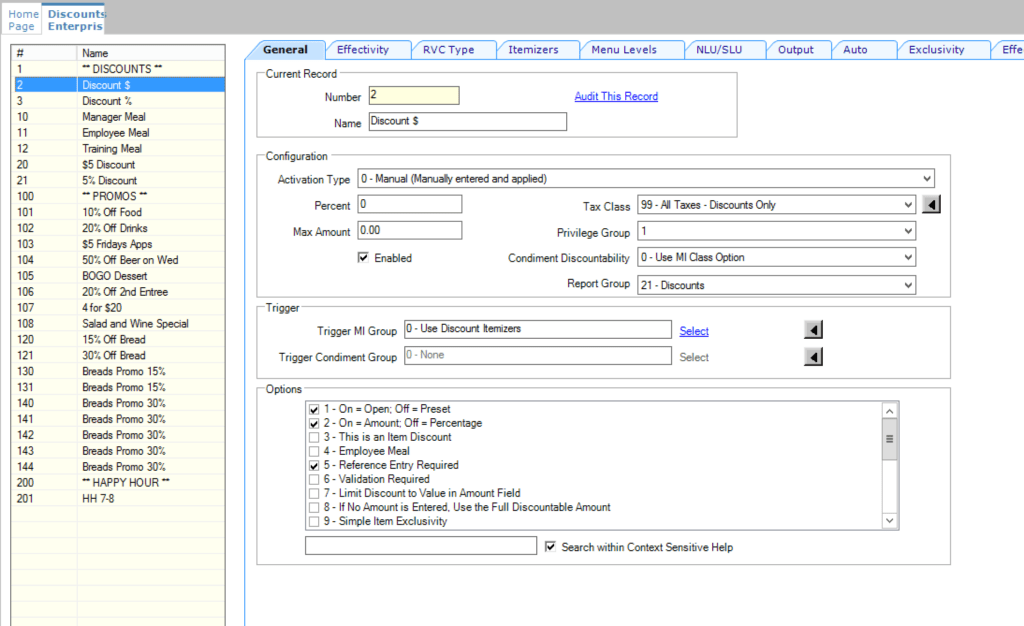
How to add Discounts in Micros Simphony Version 19

Discounts-in-micros-simphony-Main

Table of Contents (Click to Expand)

What are Discounts in Micros Simphony and how do we programm them?

Discounts in Micros Simphopny are a reduction from the usual price of menu items, typically given to some customers as a form of loyalty, campaign, or promotion. 

We have several types of discounts in Micros Simphony:

  • Manual Discounts – Where an employee presses a button on the workstation. This is a typical discount that will apply to any items, such as employee meals.
  • Automatic Discounts – Where Simphony applies the discount automatically based on certain conditions. We use this discount type for promotions such as “Buy one, get one free” or “20% off all appetizers between 5-7 PM.”
  • Coupons – This type of discount also requires several conditions to be met in order to apply, but it also requires the operator to push a button on the workstation in order to trigger. We use this when a promotion requires a physical coupon to be presented in order for it to be redeemed, such as a “10% off Food Coupon”. 

Oracle Hospitality Simphony (1) is used in many different hospitality environments, so we can pretty much create any type of discount we want, which is great, but unfortunately, that also makes the discount module very complex and difficult to program. 

In this post, I will go through the entire module and explain what everything does so you will be able to take full advantage of the system’s capabilities. 

There are hundreds of ways you can program discounts in Micros Simphony, especially the Automatic and Coupons, so I cannot cover them all here.

Luckily for you, we have a fantastic Facebook community of like-minded individuals that can answer all your Simphony questions!  Join for free below!

How to configure Discounts in Micros Simphony

Before we take a look at some examples of discounts, let’s explore the options we have available for programming discounts. 

We can find the discount module at all levels in Micros Simphony under the configuration tab -> discounts.

The General tab

Discounts-in-micros-simphony-general

As with most things in Simphony, we have to assign a number and a name. I try to keep my discounts and promos separated in order to keep the database organized, so pay attention to the number. 

The name is also very important because it will be displayed on the customer’s receipt. You will want this to be descriptive and not use any acronyms that customers will not understand. 

  • Activation type – Here is where we chose one of the three types we discussed earlier: Manual, Automatic, and Coupon. 
  • Percent – Enter the Percentage off awarded by the discount – used by percent discounts. 
  • Max Amount/ Amount – Enter the amount awarded by the discount – used by amount and percent discounts. Very useful, especially in open percent discount. 
  • Enable – Check this box to enable the discount. 
  • Tax Class – Usually, discounts apply to all taxes, but you can set exemptions here if there are any. 
  • Privilege group – set to “0” if anyone can use it, set to “1,2, or 3” if it requires manager authorization. 
  • Condiment discountability – Select if the discount may apply to condiments as well. 
  • Report Group – Select the group where the discount totals get reported. 
  • Triggers – Here, you can set limits on what the discount is allowed to be applied to.
    • We can choose to use Discount Itemizers – General filters such as Food, Beverages, or Liquor.
    • Or we can use Menu Item Groups where we can as specific as needed, such as a major group (Food), a family group (Appetizers), or even a specific group of menu items (Corona and Bud Light).
  • Option Bits – As with all other modules in Micros Simphony, the discounts have quite a few option bits. You can explore each one by right-clicking on them in EMC, and I will also list them here. 

Option bit

Description

1 – ON = Open; OFF = Preset

Select this option to make the discount open. The workstation prompts the workstation operator to enter the amount or Percentage.

Deselect this option to use a preset amount or preset Percentage for the discount.
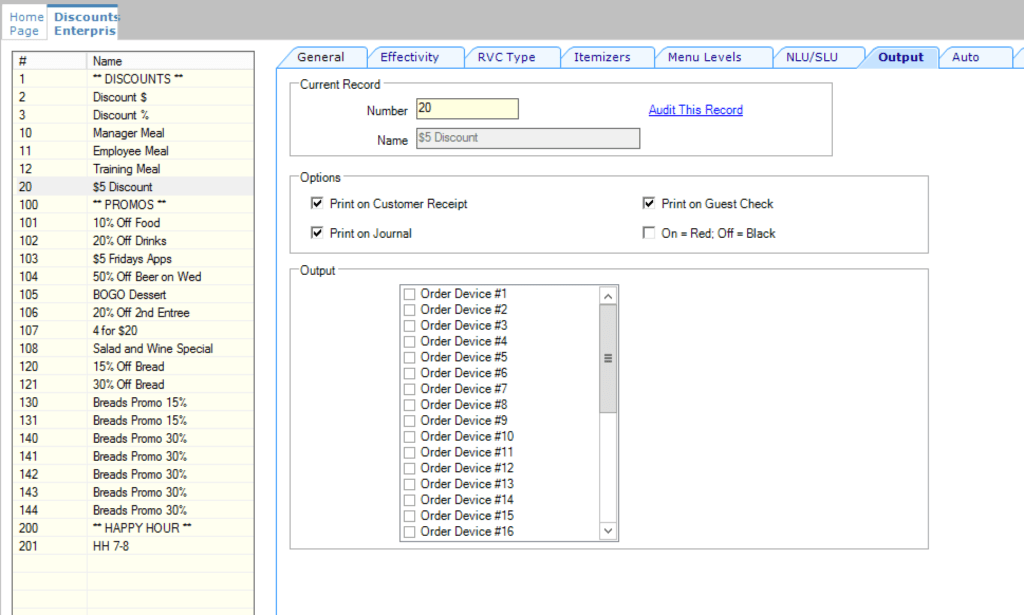
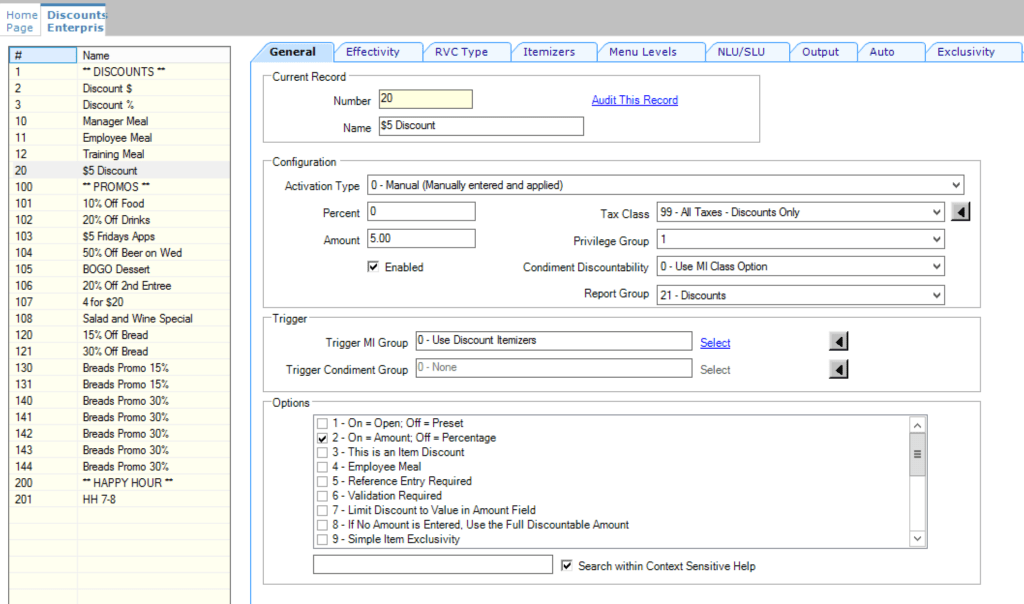
2 – ON = Amount; OFF = Percentage

Select this option to make the discount an amount. Deselect this option to make the discount a percentage.
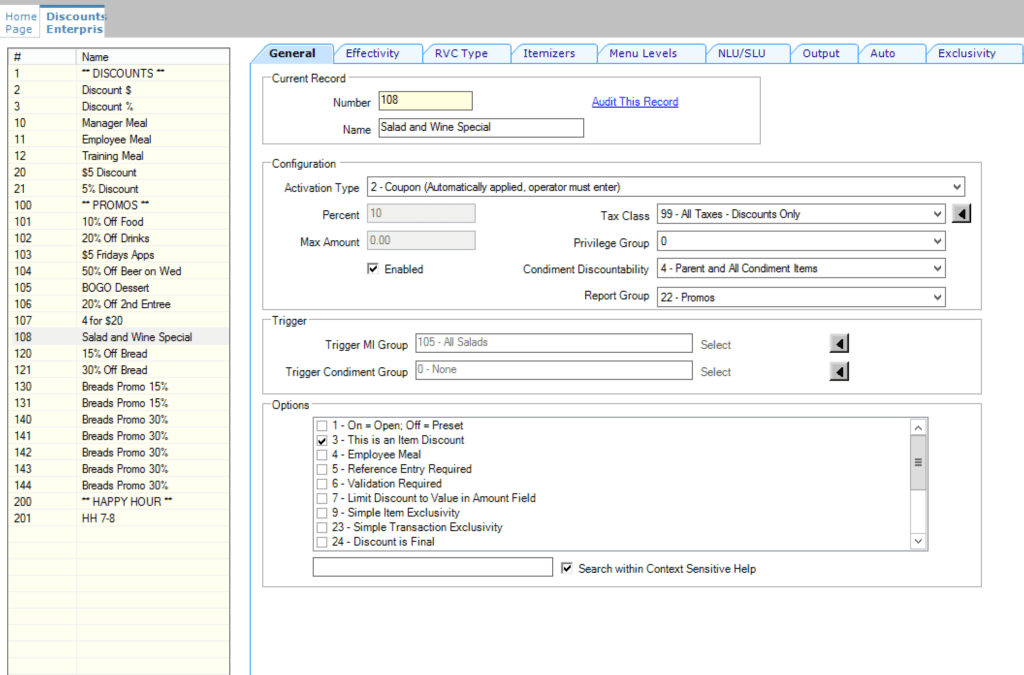
3 – This is an Item Discount

Select this option to calculate the discount based on the price of the last menu item entered. Deselect this option to calculate the discount based on the discountable transaction subtotal.

For automatic discounts, this option controls the discount sorting and consolidation on a check. When set, each item in the Menu Item Award Group shows the discounted amount on customer receipts and on the POS client. When deselected, all items in the Menu Item Award Group show a combined discounted amount as one entry.

4 – Employee Meal

Select this option to set the discount as an Employee Discount. The POS client prompts the workstation operator to enter the employee number or ID of the employee receiving the discount.

5 – Reference Entry Required

Select this option to require the workstation operator to enter a name or number when using the discount.

6 – Validation Required

Select this option to print a validation chit when the discount is applied.

7 – Limit Discount to Value in Amount Field

Select this option to limit the amount of a discount. Enter an amount in the Max Amount field, which represents the highest discount possible when setting this option.

8 – If No Amount is Entered, Use the Full Discountable Amount

Select this option to control the open amount discount calculation if the workstation operator does not enter an amount before pressing the Discount button. In short, this option allows you to set a discount as:

  • A 100% discount (if the workstation operator does not enter an amount before selecting the Discount button)
  • An open amount discount (if the workstation operator enters an amount before selecting the Discount button)

You must select option 2 – ON = Amount; OFF = Percentage to activate this option.

9 – Simple Item Exclusivity

Select this option to apply the discount to only one menu item. This setting imposes a limit of one discount per item and prevents individual items from receiving a discount more than once.

Deselect this option to have the Exclusivity tab settings determine how the discount interacts with other discounts.

10 – Tender Required (Only for Subtotal Discounts)

Select this option to require workstation operators to tender the transaction after applying a subtotal discount. You must also deselect option 3 – This is an Item Discount.

11 – Affects Auto Service Charge (Only Subtotal Discounts)

Select this option to apply the discount to Menu Item Itemizers that allow Auto Service Charges. This results in an adjusted Auto Service Charge value based on the Itemizers discounted. Deselect to keep the Auto Service Charge unchanged.

14 – Do Not Allow Subtotal Discount While Seat Filter is Active

Select this option to disallow subtotal discounts while seat filtering is active. Deselect for item discounts or when not using seat handling.

23 – Simple Transaction Exclusivity

Select this option to have the discount apply to a single transaction. This setting prevents the transaction from receiving a discount more than once.

24 – Discount is Final

Select this option to prevent workstation operators from applying additional discounts to the transaction after the discount is posted.
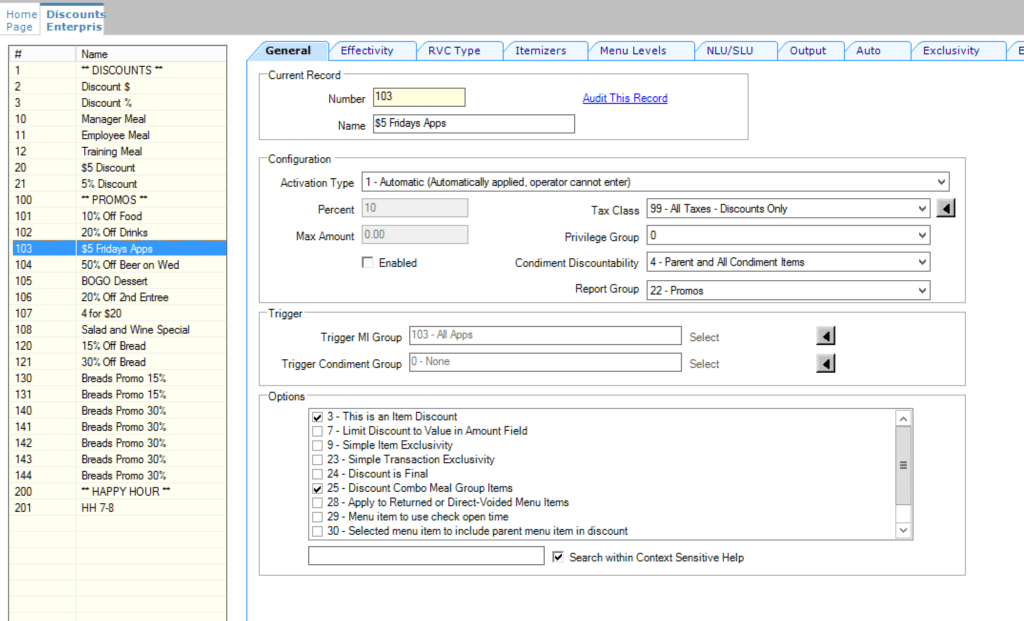
25 – Discount Combo Meal Group Items

Select this option to discount combo group menu items when the Allow Discounts option is set for the combo group.

28 – Apply to Returned or Direct-Voided Menu Items

Select this option to allow the discount to be applied to returned and voided items.

29 – Menu item to use check open time

Select this option to have a menu item use the check’s open time (instead of using the current time) to determine effectivity of the discount.

30 – Selected menu item to include parent menu item in discount

Select this option to include a parent menu item in the discount when the workstation operator selects a child menu item for the discount.

31 – Net Automatic Service Charge Itemizer

Select this option to post the net value of the menu item to the Automatic Service Charge Itemizer, reducing the Automatic Service Charge after the discount is applied.

This option is available when you set option 3 – This is an Item Discount (above) and option 12 – Add to Automatic Service Charge Itemizer from the Menu Item Classes module.

32 – Limit Discount value to value of Discountable Item

Select this option to limit the discountable amount to the item or award when the Amount Off exceeds the item or award. For example, if the Amount Off is $5.00 and the item or award is $4.00, the discount is limited to $4.00.

33 – Cash Management Transaction Item

Select this option to include the discount in Enterprise Cash Management (ECM) tracking and reports.

The Effectivity Tab

This tab is pretty straightforward, you can set the start and end time of the discount here. 

You can also set the discount to only apply on certain days of the week and between different times. 

This is very helpful for discounts that apply around happy hours or when we run promotions on slower days such a “30% off Apps on Tuesdays.” 

The RVC Type Tab

In this tab, you can control which RVCs are allowed to use the discount. If you run a promo that is available only at the Bar, it’s a good idea to limit it here to avoid server error. 

The Itemizers Tab

Discounts-in-micros-simphony-Itemizers

The Itemizers tab for Discounts in Micros Simphony allows us to filter which items are allowed to be discounted. 

For Example: if your employee discount is 50% off food items and an employee orders a drink with their meal, then the discount will only apply to the food. 

Note: if you choose to use Menu Item Groups instead of Itemizers, then this tab will not do anything.

The Menu Levels Tab

The Menu Levels tab can be used for more advanced programming when menu levels are in use.

An example of this would be a discount on items when ordering a double shot of liquor. 

The NLU/SLU Tab

Just like with Menu Items in Micros we can add the discounts on the screen in two ways: 

  • Hard code them individually, used for permanent discounts that are used often
  • Used an SLU, where all the discounts that change ofter populate automatically.

There is also a way to find a discount using a Numeric Look Up or NLU, where you can push a button and enter the discount number. Very useful when there are a lot of coupons being used to save time for the operator. 

The Output Tab

We can use the Output tab to program the discount to print on the customer receipt, the journal, or even on the order devices if needed. 

The Auto Tab

Discounts-in-micros-simphony-auto

The Auto tab becomes available when selecting the Automatic and Coupon discount type.

It is one of the more complicated tabs in the discount module so we will discuss it in detail further below. 

The final two tabs are Exclusivity and Exclusivity Groups, and they are used for programming the discount or transaction exclusivity when we have discounts that should not combine with each other. 

For more Free Content on other Simphony modules, also read HERE.

Manual Discounts in Micros Simphony

Manual discounts can be applied by pushing a button on the workstation. We can identify 2 sub-types:

  • Subtotal discounts – Where the discount applies to the entire check.
  • Item Discounts – Where the discount applies only to the selected menu item. 

Subtotal Discounts

By default, all discounts are subtotal discounts unless otherwise specified. They apply by discounting all the menu items present on the check. 

Example: If you apply a $5 subtotal Discount to a check containing two menu items, each item will receive a $2.5 discount, effectively deducting the $5 off the check total. 

Discounts-in-micros-simphony-subtotal discount

Programming a $5 Subtotal Discount

Discounts-in-micros-simphony-5dollar discount

Here is how you can program a $5 Subtotal Discount:

  • Activation Type: Manual
  • Amount: $5
  • Option Bits: only #2

You can add other option bits if needed such as:

  • 4 – Employee Meal (to enter the employee ID)
  • 5 – Reference Entry Required (to enter more details about the discount)

Programming a 5% Subtotal Discount

Discounts-in-micros-simphony-5percent discount

We can easily transform the $5 discount into a 5% discount by unchecking option bit #2 and moving the 5 in the percent field instead of the amount field. 

Programming an Open $ Subtotal Discount

Discounts-in-micros-simphony-open dollar discount

These discounts are used when we don’t have a specific one programmed and need a general-purpose discount. 

I recommend using privilege group 1 with this one so a manager would need to authorize it and also option bit #5 – Reference entry required, so you can provide more detail as to why it’s being used. 

Other than that, we will need to enable option bits #1 and #2 for it to work correctly. 

Automatic Discounts in Micros Simphony

Let’s take a look at how we would program an automatic discount. We will take the example of “$5 Fridays Apps” – all appetizers are $5 on Fridays. 

This is how the general tab would look like:

Discounts-in-micros-simphony-auto discount general
  • Activation type: Automatic
  • Option Bits: #3 and #25 (optional)
  • We will also set the effectivity to Friday only, and a time constraint if needed
  • Since this is an automatic discount, the majority of the programming is done in the Auto tab:

In the Auto tab, we will set the following options:

  • Discount Rule: Item Price Substitution
  • Trigger Group: All Apps (since this only applies to Appetizers)
  • Minimum Quantity: 1
  • Award: Amount Substitution = $5.00

And this is how it would look on the workstation: 

Since the Ahi Tune and Empanadas are part of the Appetizers, they were discounted automatically (no input required from the server), but the Gnocchi and Pizza were not because they are main courses. 

Promo Discounts in Micros Simphony

As mentioned before, Promo discounts in Micros Simphony are also a type of automatic discount, but they do require input from the server, bartender, or manager in order for them to apply. In other words, the customer needs to present a voucher, mention a promotion, like our Facebook page, write a review, or do something else in exchange for this Promo to apply. 

Here is an example of how we programmed our Salad and Wine Coupon deal: Order any Salad and a Glass of wine for only $10. 

In the general tab, we only need option bit #3 since this will be an Item Discount. 

As with the Automatic Discount, the programming is done in the Auto Tab:

Discounts-in-micros-simphony-coupon auto
  • The Discount Rule we will use is #4 – Combination Pricing
  • For triggers we will have two Menu Item Groups :
    • All Salads 
    • All Wine by the Glass
  • Award: Ammount Substitution: $10

And this how it would look like on the workstation:

Discounts-in-micros-simphony-workstation promo

After adding the menu items, I have to push the Salad and Wine Special button for the discount to apply, the system will not do it automatically, but it will check that the conditions are met (there is a salad and a glass of wine on the check). 

If you are interested in learning more about Automatic Discounts and Coupons, check out my article on Automatic Discounts.

There are hundreds of ways you can program discounts in Micros Simphony, especially the Automatic and Coupons, so I cannot cover them all here.

Luckily for you, we have a fantastic Facebook community of like-minded individuals that can answer all your Simphony questions!  Join for free below!

Now it's your turn!

And that is it for my Guide on Discounts in Micros Simhpony!

  • What discounts do you use in your system?
  • Do you have any discounts that you could not program?
  • How often do you use coupons to promote your restaurant?
  • Let me know in the comments below!

Leave a Comment

Your email address will not be published. Required fields are marked *

Get Exclusive Simphony Tips

Receive the same Tips I used to manage my Simphoony POS

*We respect your privacy and Do Not Spam.

Please share this article

Scroll to Top