What are Condiments in Micros Simphony and how do we programm them?
Condiments are items that provide details to the cooking stations and bars detailing how to prepare food and drinks. Some examples include meat temperature or omelette toppings.
- Beef Tenderloin – Medium Rare
- Omelette: Cheese, Tomato, and Onion.
For drinks, we can find condiments such as: on the rocks, extra lime, and a splash of soda.
In Micros Simphony we can identify Required Condiments and Allowed Condiments, and sometimes a combination of both.
Required condiments are usually enforced, as they are vital to the menu item order, like our previous example with the meat temperature. If the required condiment, “medium rare” is not present on the check, the kitchen will not know how to cook the steak, and the order cannot proceed.
Allowed condiments are optional but just as important. A good example would be Caesar Salad – DOS (dressing on the side). It is not vital to the order if the DOS condiment is not present on the ticket, the kitchen will still prepare the salad; however, when it arrives at the table, the guest will most likely refuse it and request a re-cook.
Micros Simphony is one of the most comprehensive Point of Sale systems, being used by a small coffee shop with one workstation and an entire stadium with thousands of them, and it has the complexity to fit any scenario. That is great from Oracle Hospitality’s point of view because they can sell the system to everyone, but that makes it extremely complex to program, and especially the condiments module has historically been hated by all restaurant managers and property experts that have to program them.
In this post, I will go over the programming of both Required and Allowed condiments, teaching you how to add, remove and replace condiments.
Condiments are one of the more complex modules in Micros Simphony and can be programmed in many different ways, which makes them very useful, but also challenging to program. No matter how much I try, I cannot cover all the different situations you may find yourself in when programming condiments.
Luckily for you, we have a fantastic Facebook community of like-minded individuals that can answer all your questions! Join for free below!
How to setup condiments in Micros Simphony?
Setting up condiments from scratch in Micros Simphony is quite a lengthy process, and it involves a couple of steps:
- Defining the condiment group names
- Adding the condiment menu item class
- Adding the condiments to the database
- Linking the condiments to the menu items
1. Defining the condiment group names
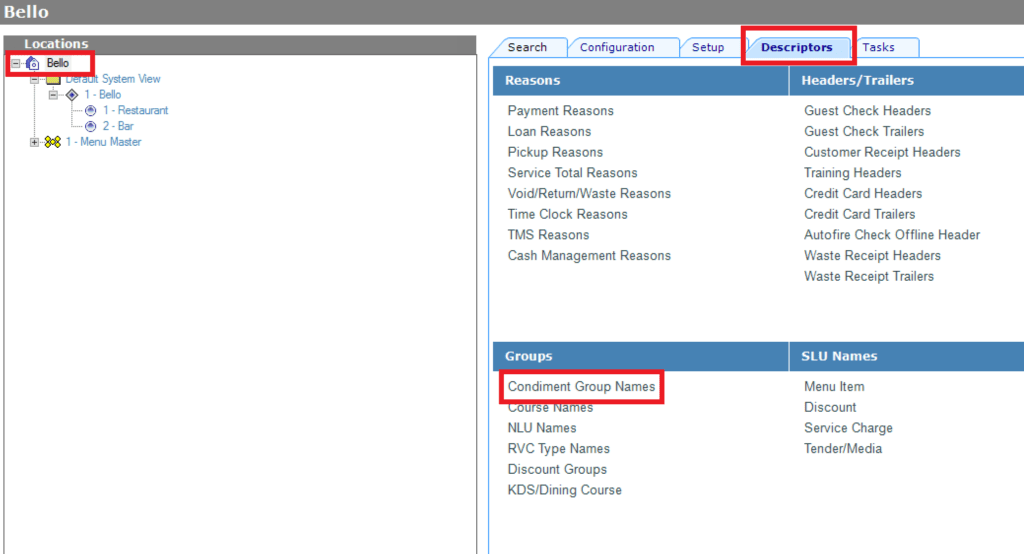
We can find the condiment group names at all levels in Micros Simphony, but it is recommended to define them at the enterprise level, just so there is no overlap or confusion.
To locate the module, select the enterprise-level, descriptors tab, Condiment Group Names.
There are 256 fields available here; to claim one, locate an empty spot and add the name of the group. It is best practice to name the group something descriptive, such as meat temperature, omelet toppings, or salad dressing.
Top Tip: The number of the condiment group will determine the order in which they appear on the POS if you have multiple groups required.
Example: if you sell a burger and the required condiments for it are:
1. Cheese Choice
5. Meat Temp
10. Side Choice
The required condiments will appear for the operator in the order: Cheese Choice, Meat Temp, and Side Choice, and we cannot change that later on. Most servers prefer to enter the Meat Temp first, then Cheese and Side, and they will complain about it to their manager, so it’s recommended that you are very careful when defining the condiment group names.
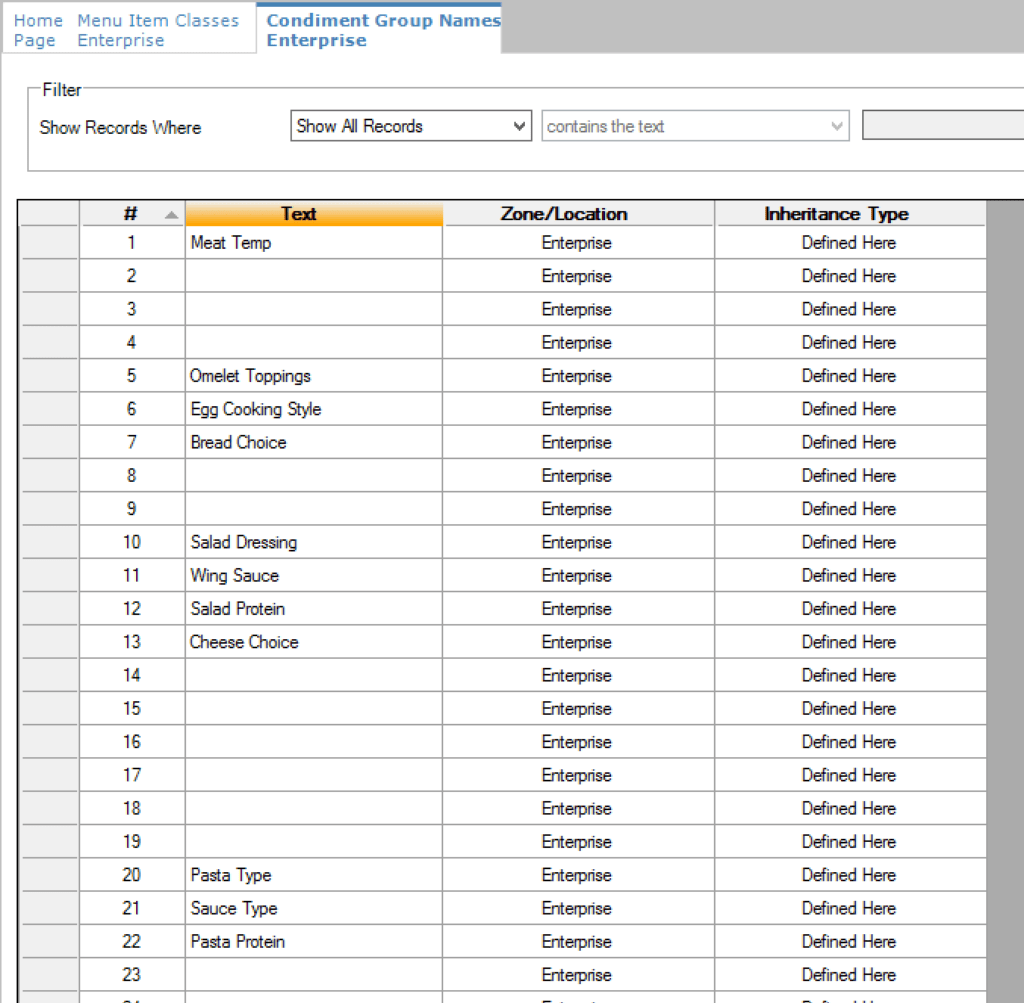
2. Adding the Condiment Menu Item Class
The key to linking a menu item (Steak) to a condiment (Medium Rare) is in the menu item classes.
This link is what makes defining condiments confusing for most restaurant managers and the #1 reason for frustration and hatred towards this module of Micros Simphony.
I wish they would have made this a lot simpler and straightforward, but because of the complexity I mentioned earlier, we just have to pay very close attention.
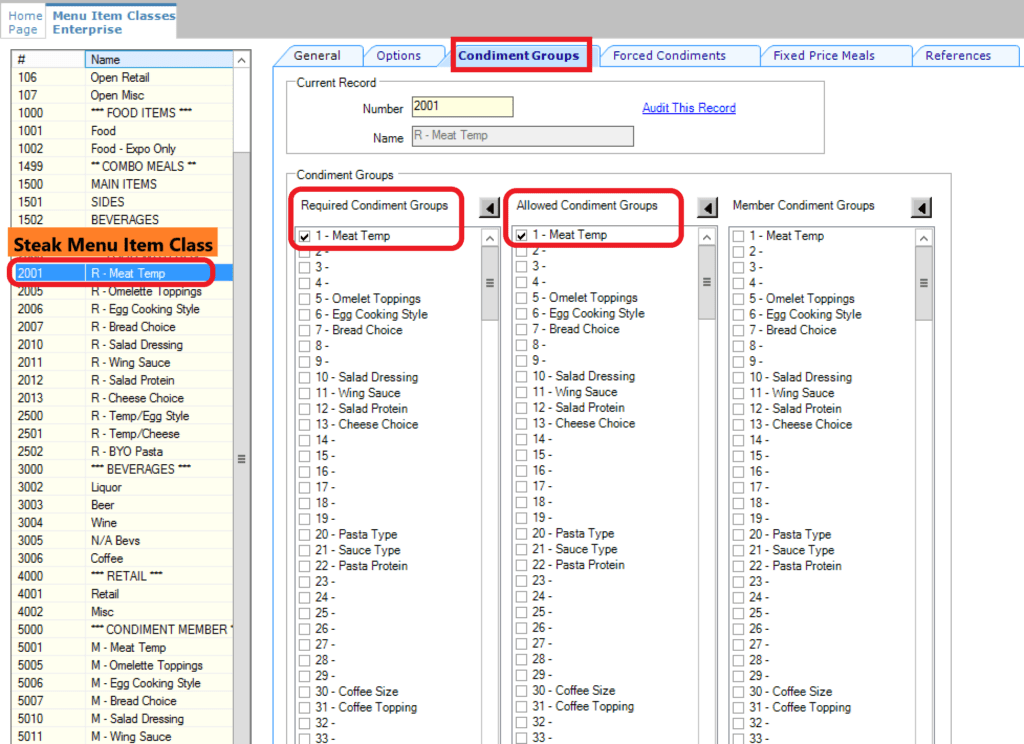
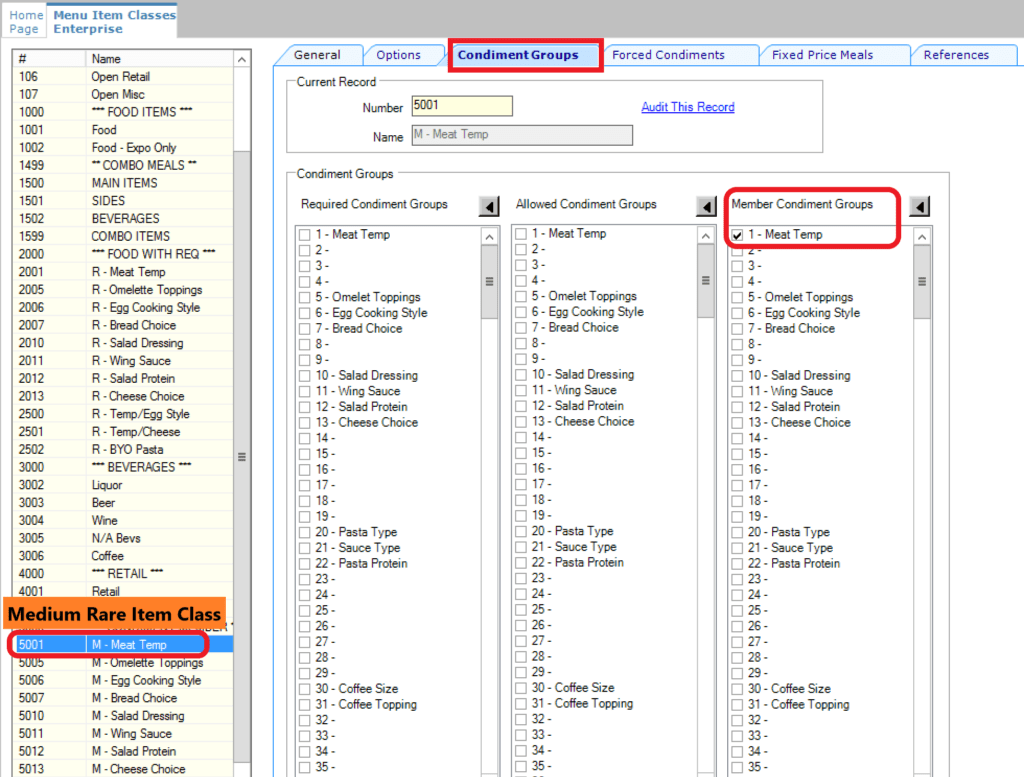
The way we link our Steak to its Medium Rare condiment is by using the same condiment group number in both menu item classes:
- Steak menu item class (labeled Requires group 1 – Meat Temp)
- Medium Rare item class (labeled Member of group 1 – Meat Temp)
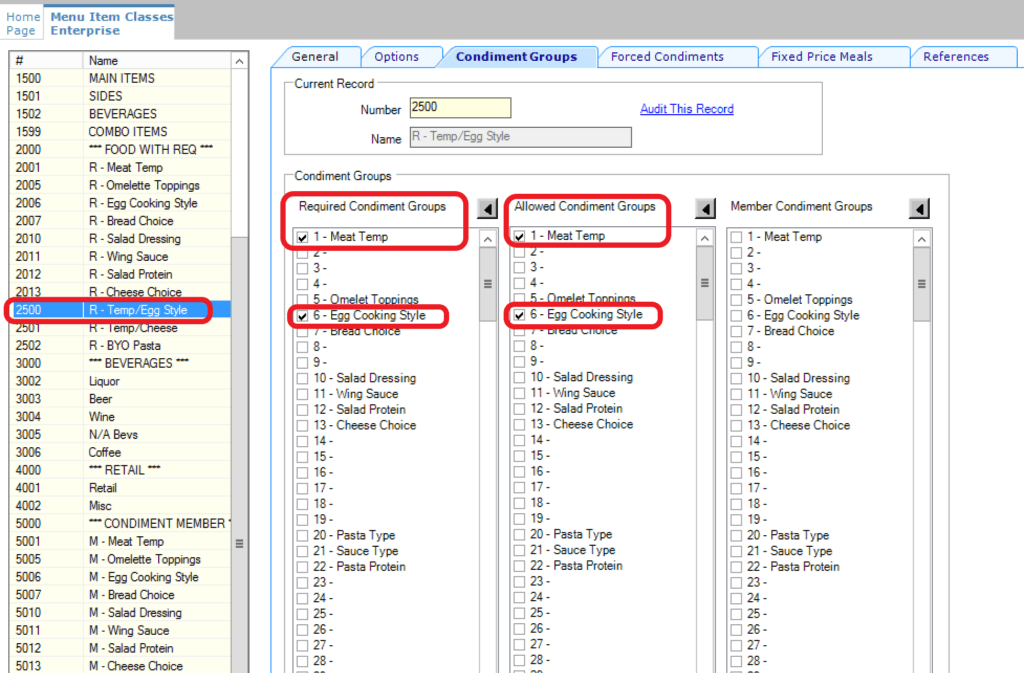
The Steak menu item class will Require and Allow “Group 1 – Meat Temp” (check the boxes for required and allowed)
The Medium Rare item Class will be a Member of “Group 1 – Meat Temp” (check the box for member)
Note: For Allowed Condiments only, the procedure is the same, but you only check the box for the allowed condiment group.
If a menu item requires multiple condiment groups, you will have to add a new menu item class and check the boxes for both required and allowed for all groups.
For example, our Steak and Eggs breakfast item required both meat temperature for the steak and egg cooking style for the eggs. In this case, I will use both Condimente groups 1 and 6 and check the boxes for both required and allowed.
For the condiment members, I will need to have a membership for groups 1 and 6 defined, and we can use the same ones we have for our steak; that’s why we label it “Meat Temp”, not “Steak Temp”.
Now that we understand how we link the menu items to the condiments, let’s take a look at how we add the menu item class for the condiment members.
When adding membership classes for your condiments, it’s recommended that you keep a conventional naming scheme and add them all in the same number block to keep your database organized.
I reserved the 5000’s block for my condiment memberships and name them “M – condiment group name”. I also keep the position the same as the group number.
For example: For Member Condiment Group 10 – Salad Dressing, I will add Item class 5010 – M – Salad Dressing. With the “M” standing for Membership.
This way, I know what the Item Class is used for, and if I ever need to use Condiment Groups 3 or 4, I can add them at positions 5003 and 5004 and keep my database nice and organized.
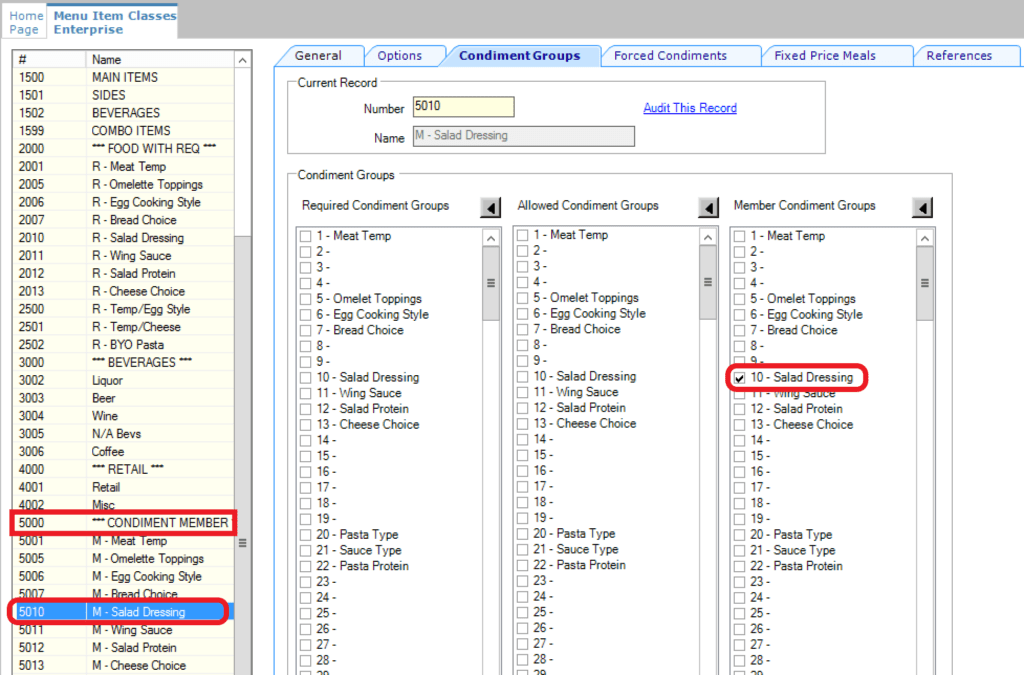
Now that we know the name and potion of our new Condiment Item Class, all we have to do is press the Insert Key (green plus on the top bar). As with adding anything in Micros Simphony, I recommend using another class as a template, this will make the process much faster and easier.
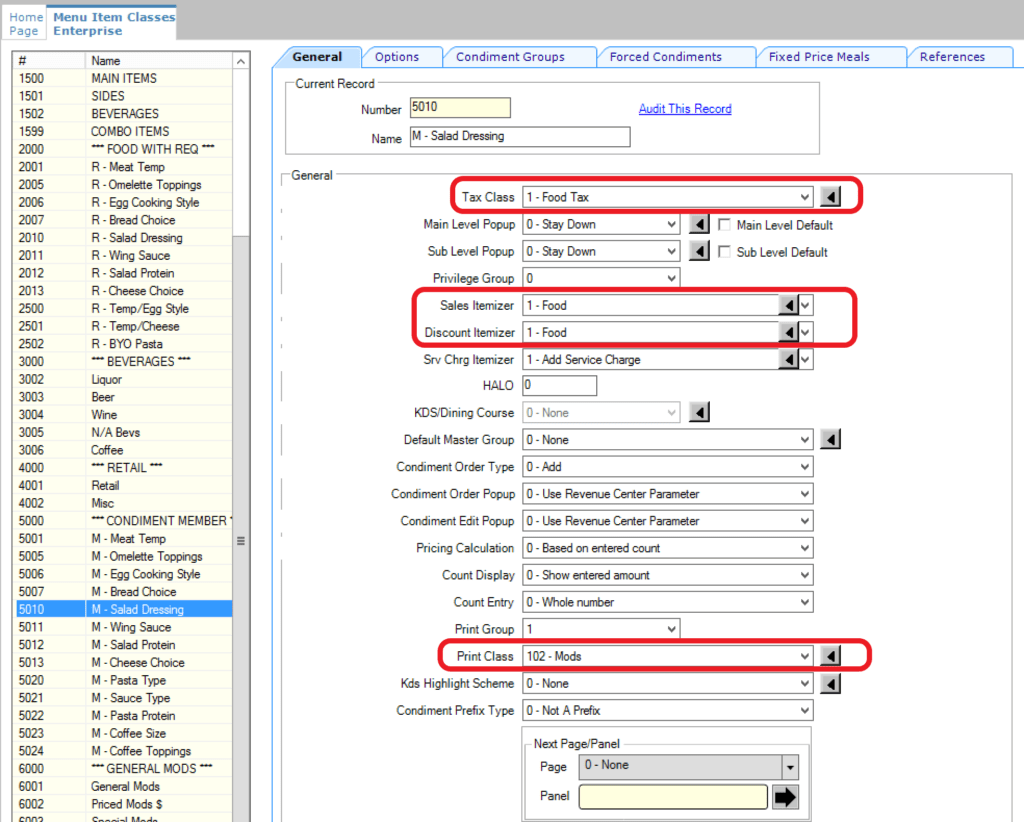
In the General Tab, we will define the tax, itemizers, and print class.
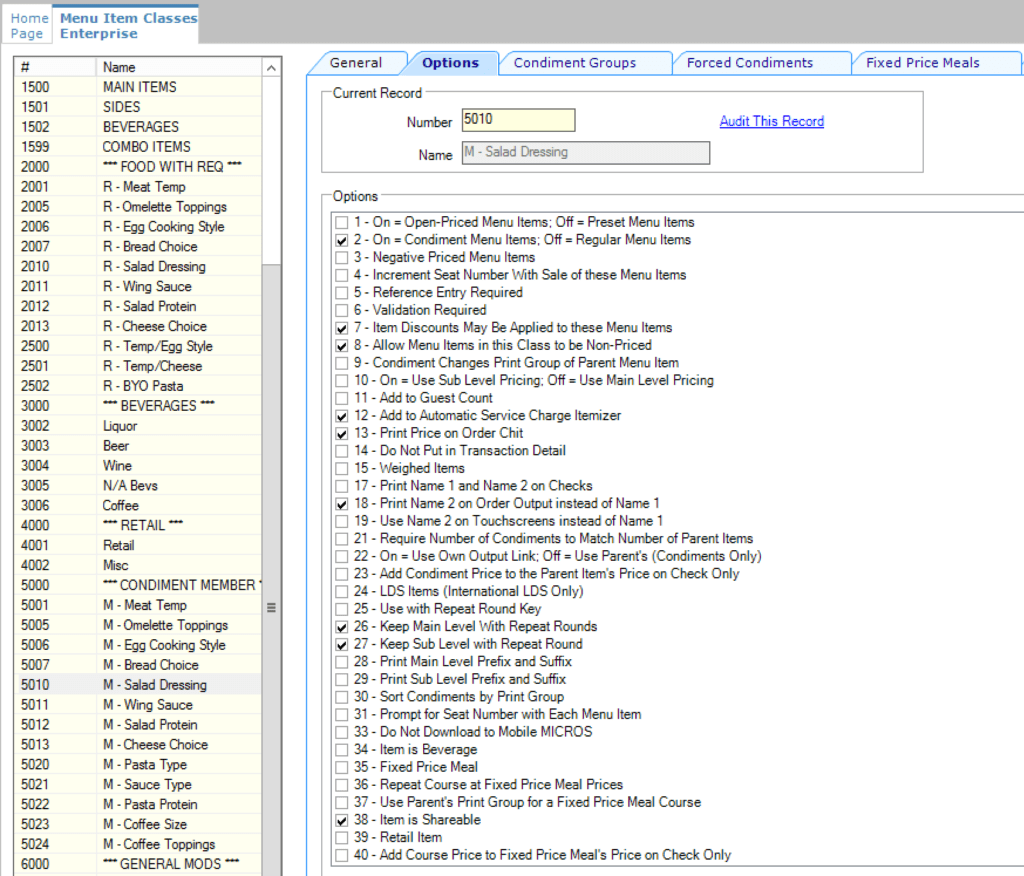
In the Options tab I have selected bits: 2, 7, 8, 12, 13, 18, 26, 27, 38.
We have already covered the condiment group tab, and you can ignore the rest of the tabs, are they are used mainly for classes belonging to menu items.
For more Free Content on other Simphony modules, also check this Simphony Article.
3. Adding the condiments to the database
Adding condiments to the database is a very straightforward process, and it’s identical to adding regular menu items in the menu item maintenance module. If you need a refresher, check out my post on adding menu items in Micros.
The only things you have to look out for are the positions where you add the Condiments, for organizational purposes, and to link them to the correct item class.
I add all my required condiments in the 100,000’s block and keep the groups separate:
- Group 1 – 101,000 to 101,999
- Group 5 – 105,000 to 105,999
- Group 6 – 106,000 to 106,999
- and so on.
This will ensure your database will stay nice and clean and leave plenty of space for expansion.
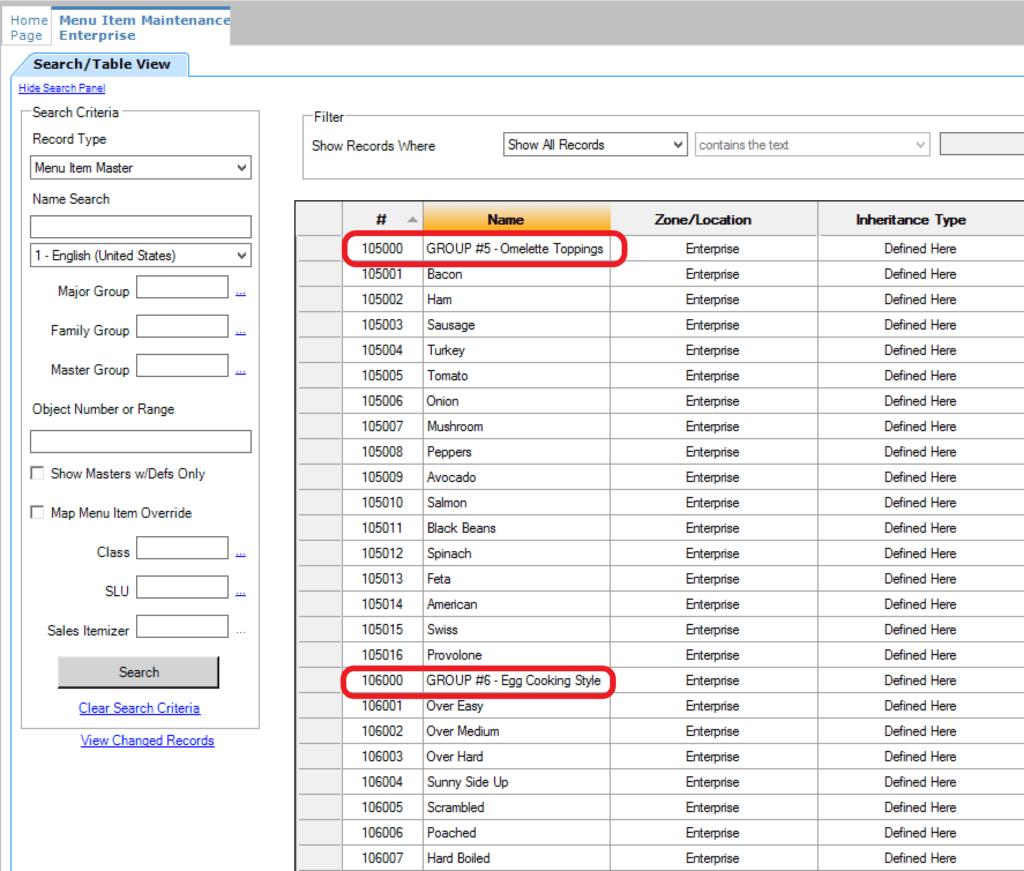
The Definition tab is where we link the condiment to its menu item class and implicitly to its membership.
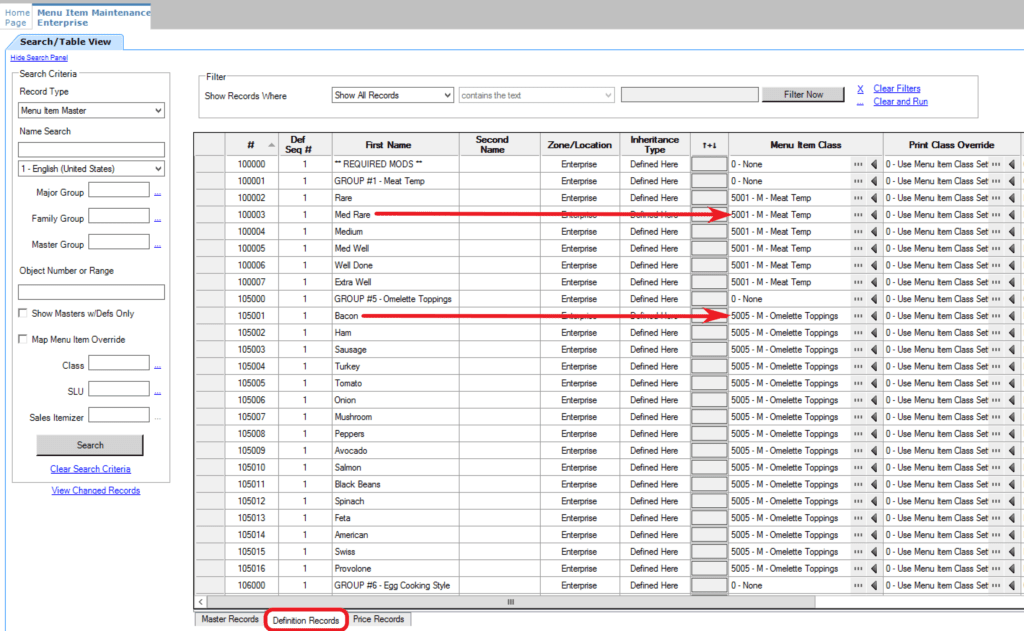
One more thing you will want to pay attention to in the Definitions tab is the Print class override. While most condiments are not priced and should not print on the guest check, some priced condiments should print.
For example:
- The “medium rare” condiment should not print on the guest check
- The “extra chicken” ($5) priced condiment should print on the guest check so your customers understand what they are paying for.
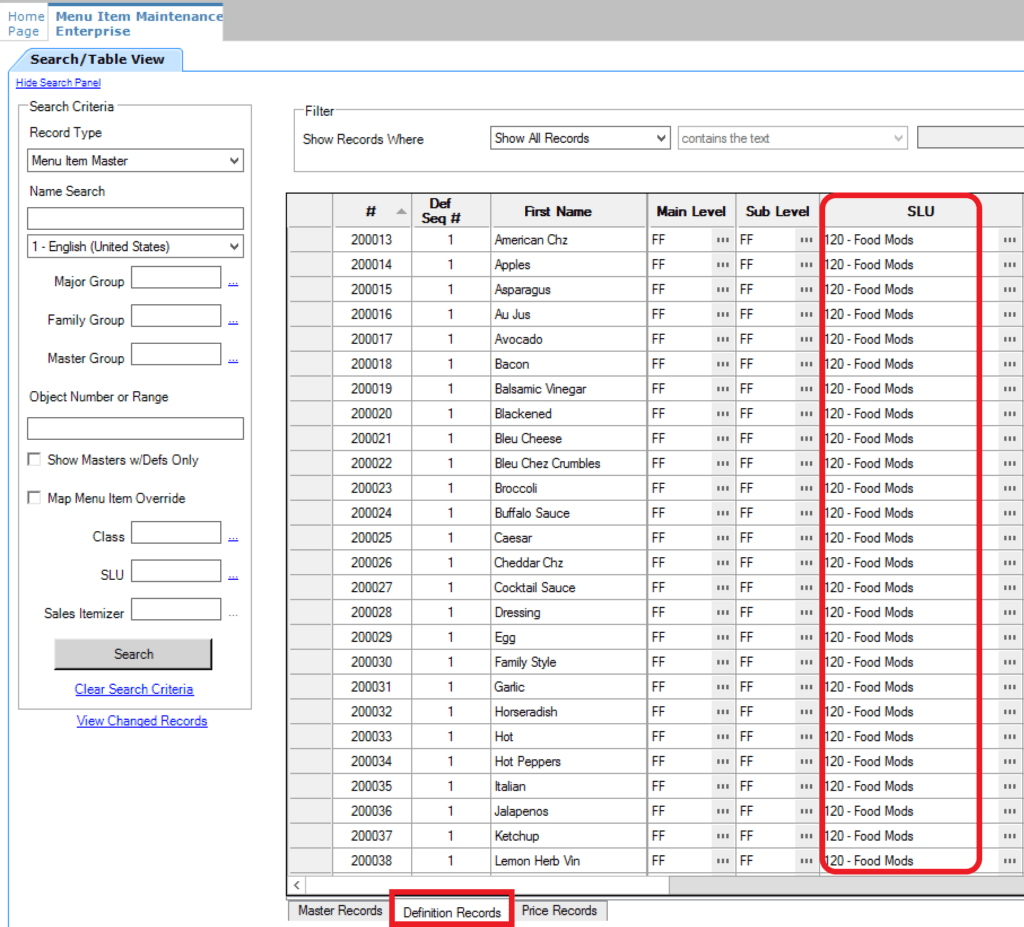
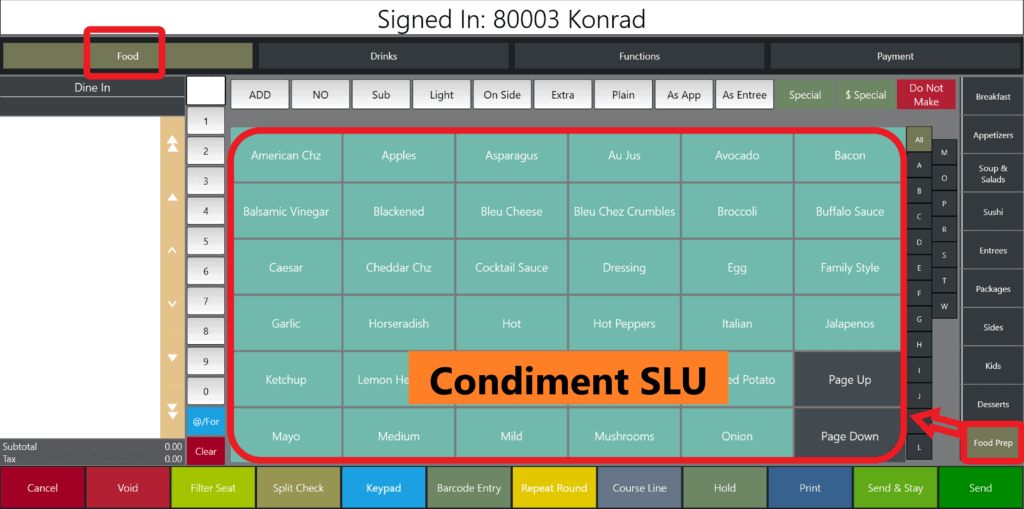
For Allowed Condiments, we can also define an SLU (screen look-up) in the definitions tab, so we can populate them on the screen.
For my General Food Condiments, I use SLU “120-Food Mods” and then add the SLU in page design on my food screen. All these general condiments are allowed for all food items and can be used as needed.
4. Linking the menu items to the condiments
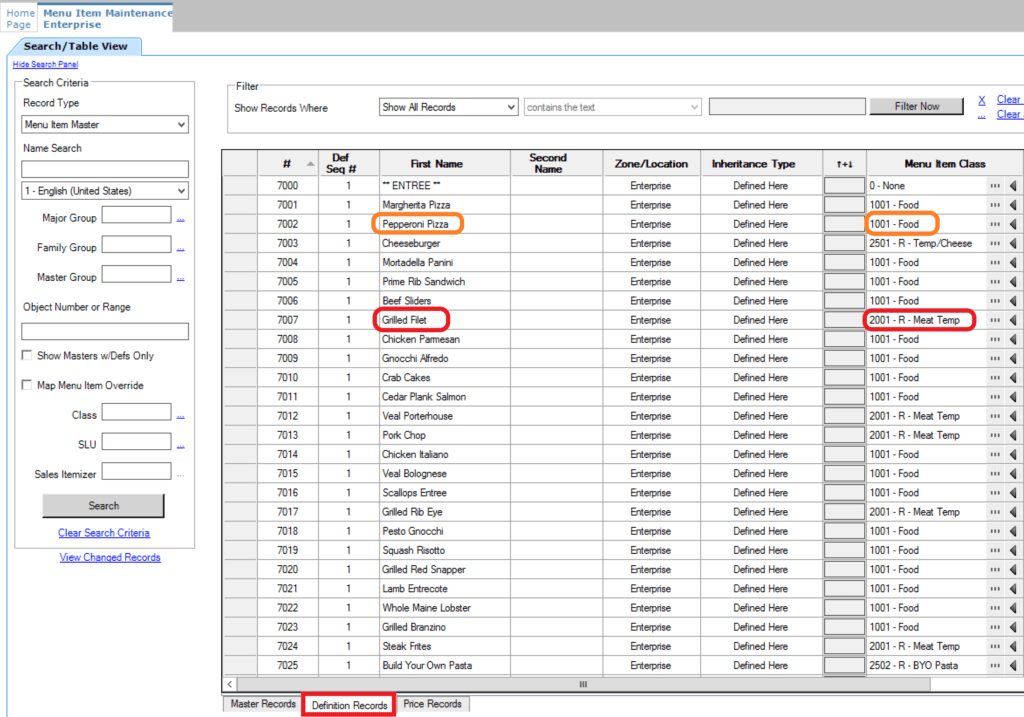
In order to make the menu items request the condiments, all we have to do is adjust their menu item class to one that requires or allows those condiments.
For example:
- my Pepperoni Pizza does not require any condiments, so its menu item class is 1001 – Food, which only has allowed condiments.
- but the Grilled Filet does require Meat Temperature, so its menu item class is 2001 – R – Meat Temp, which has all the allowed condiments but also requires meat temperature.
Populating condiments on the screen: SLU or Pop-up?
When it comes to allowed condiments, the choice is simple: we always populate them on an SLU somewhere in the food or bar section.
But what about Required Condiments?
Required condiments can also be populated on an SLU and placed on the page, but I prefer using a pop-up. Why? Because the pop-up doesn’t take up any space, and I don’t have to worry about making sure I add a condiment SLU on each section that has menu items.
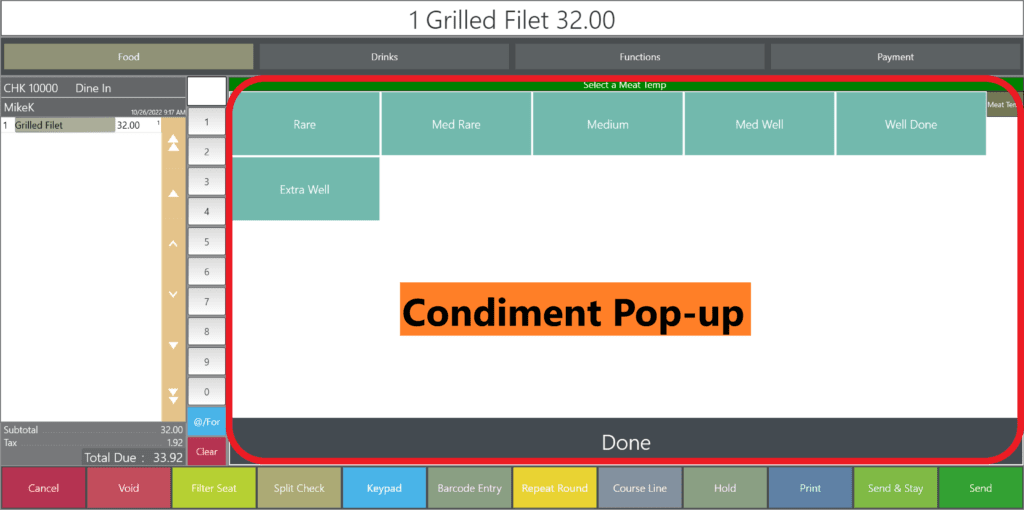
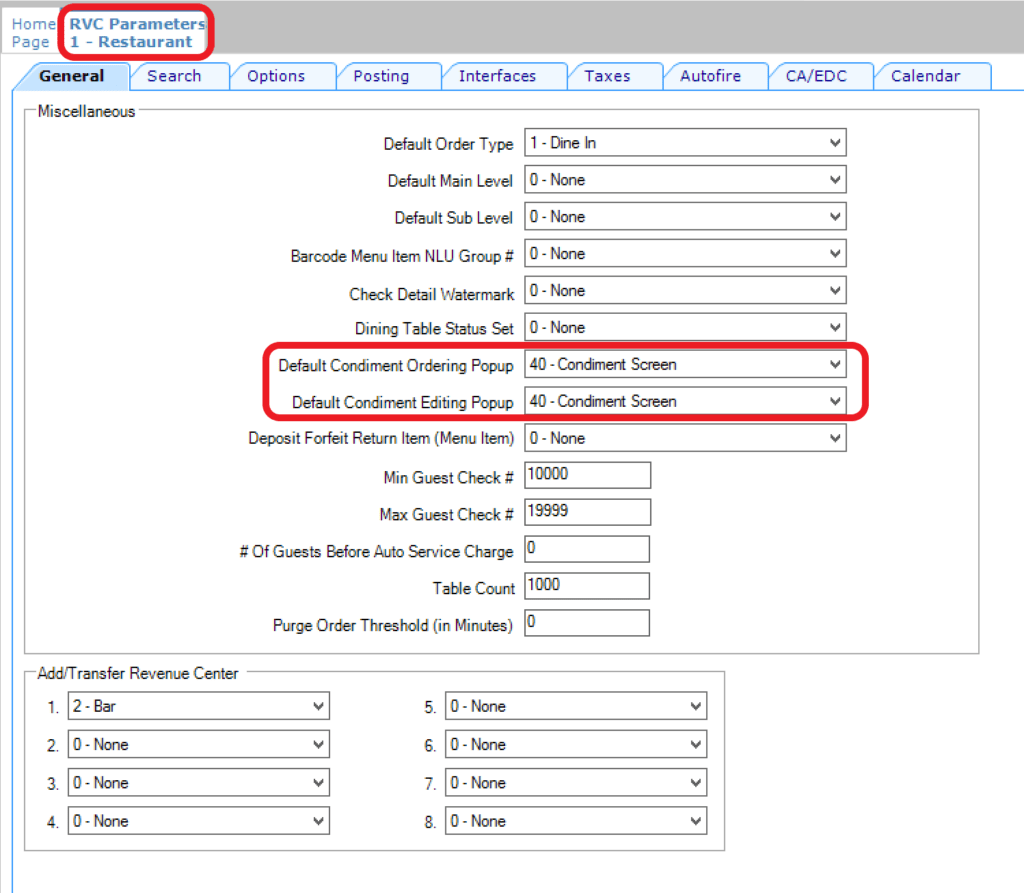
In order to use a condiment pop-up, all I have to do is to create it in Page Design and link it in the RVC Parameters tab.
Advanced Condiments
While you program your condiments in Micros Simphony, you may also encounter more advanced features, such as Condiment Sets and Prefixes. These are used for Conversation Ordering and Combo Meals, which are not in the scope of this post so I will not cover them here.
If you are looking for comprehensive Simphony Training, we have a complete online course and support platform. More details below.
Now it's your turn!
- Do you have any questions on how to program condiments?
- Do you prefer to use an SLU or a Pop-up?
- How did you define your condiment groups?
- Let me know in the comments below!


2 thoughts on “How to program condiments in Micros Simphony 2025”
Hello,
I’ve gone over and over the Condiments video and written help. I’ve tried to follow the directions as closely as possible.
I’ve created the “R” item class (temperature), and I’ve created the “M” item class (hot, cold).
I’ve linked them by the condiment group as instructed for both menu classes (Temperature required for “R”, Temperature member for “M”)
I’ve replaced the existing menu class for my menu item (Cocktails) to the new “R” class (Temperature).
However, when I press the menu item on my screen and expect the condiments to pop up, I get a dialog box that says “Condiment not allowed: no default parent”
Any thoughts on what I might have done incorrectly?
Thanks for your help! K
Have you linked the M – Classes to the condiments? and are the condiment groups also allowed as well?