Menu Levels in Micros Simphony: Single/Double, Happy Hour Configuration

Menu-Levels-main

Table of Contents (Click to Expand)

What are Menu Levels in Micros Simphony?

Menu Levels in Micros Simphony (1) are an advanced programming module used to configure availability for menu items, discounts, service charges, and tender media. 

The most common use for menu levels is to configure menu item availability, either the entire item or just one of its components: the price. If we define multiple price records for the same menu item and use the menu levels to filter which one is active, we can program happy hour and single/double shots at the bar. 

Another use for the Menu Levels that is not so common is Conversation Ordering, which uses many customer menu levels to achieve fast ordering and parent switching for fast passed environments such as coffee shops and fast food restaurants. 

We can identify 3 types of Menu Levels in Micros Simphony:

  • Main Levels
  • Sub Levels
  • Custom Menu Levels

In this article, we will discuss the Main and Sub Levels and how we use them to program Happy Hour and Single/Double Shots. 

Configuring Menu Levels can get quite complicated, luckily for you, we have a fantastic Facebook community of like-minded individuals that can answer all your questions!  Join for free below!

Configuring Menu Levels in Micros Simphony

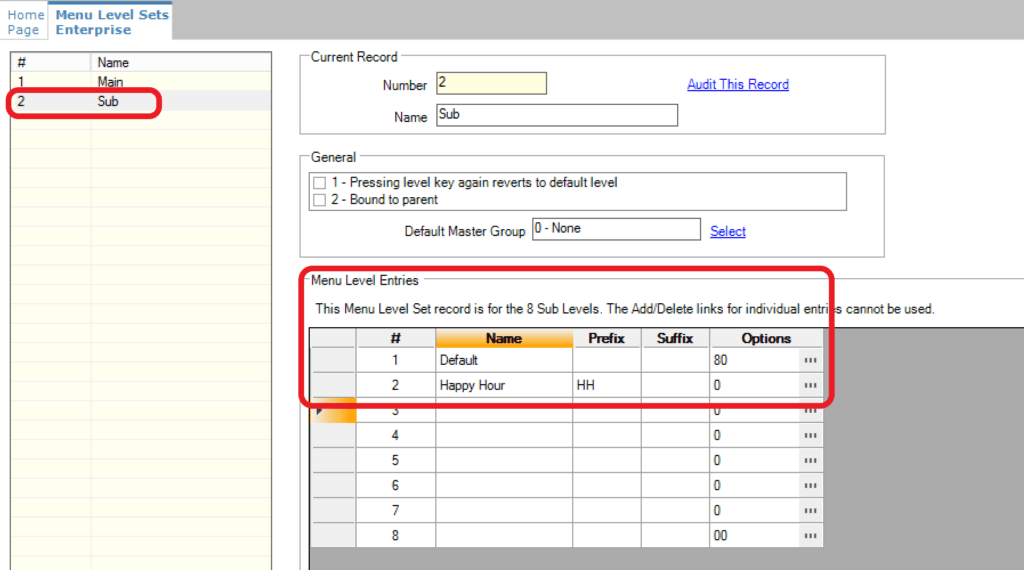
We define our Menu Levels in the menu level sets module. This module can be found at all levels in Micros Simphony (enterprise, property, and RVC) under the Configuration tab, Sales section. 

If you need a refresher on how to navigate around, check out my article on EMC.

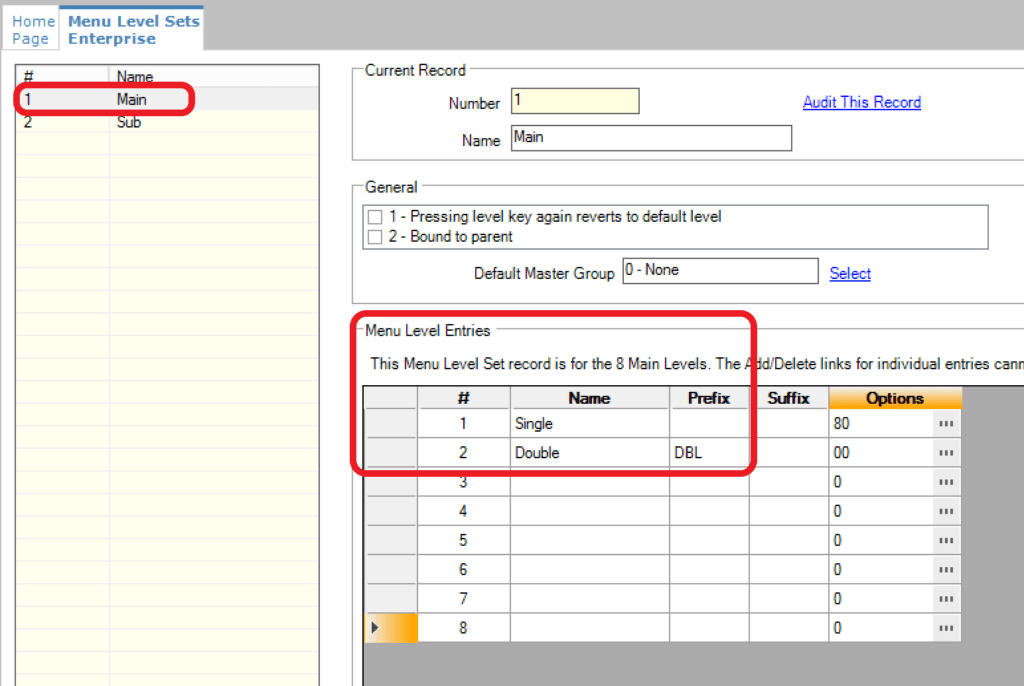
The system already has the Main and Sub menu levels defined, but we can also add other (custom menu levels) using the insert key. 

Despite their names, the main and sub menu levels can be used for any kind of programming, and both have the same options. There is no difference between them besides the name. 

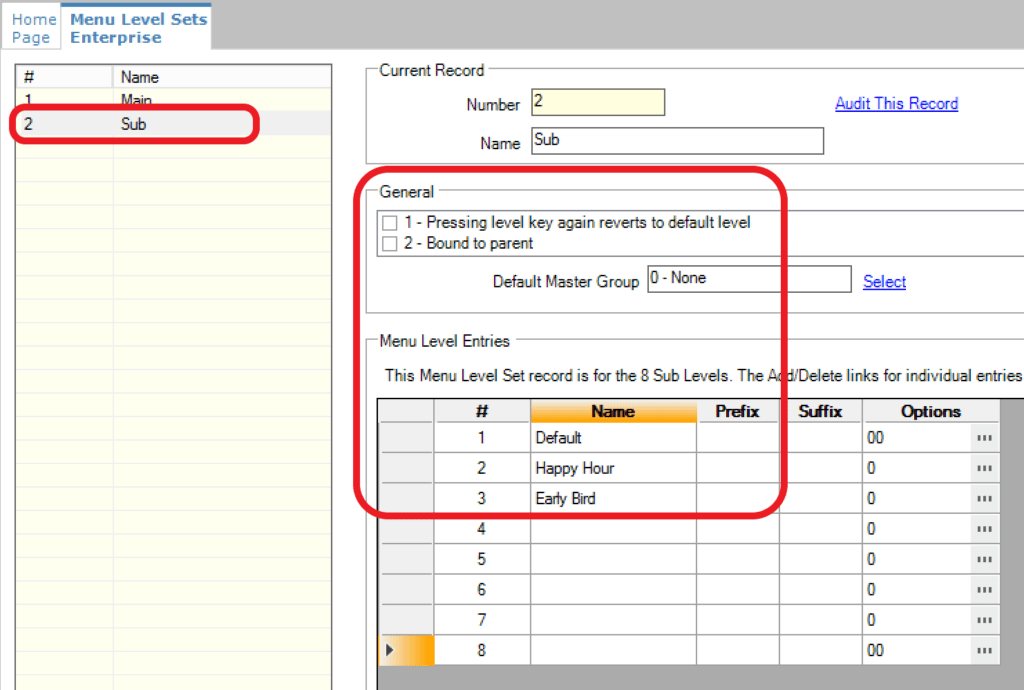
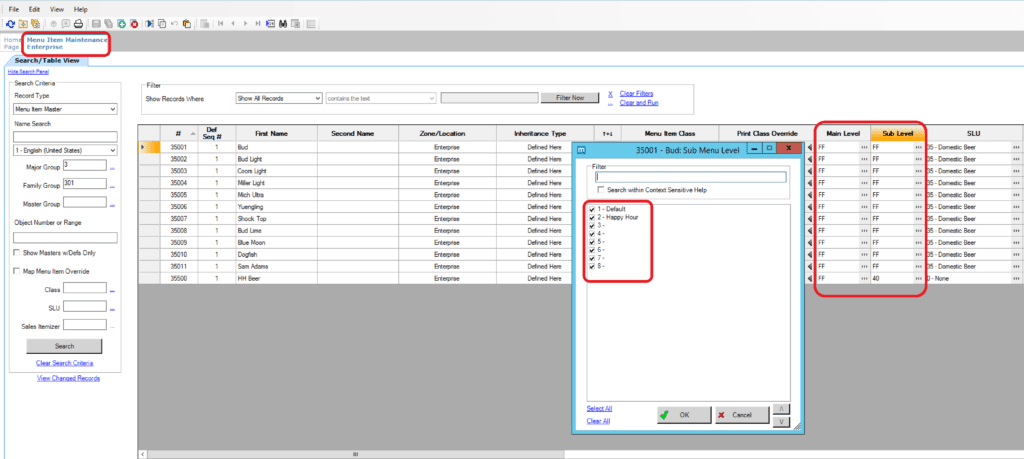
Each main and sub menu levels have eight entries available that we can use. Here, we will define the name, a prefix and suffix, and two option bits. 

In the name field, we want to enter the name of the level. Example: single and double.

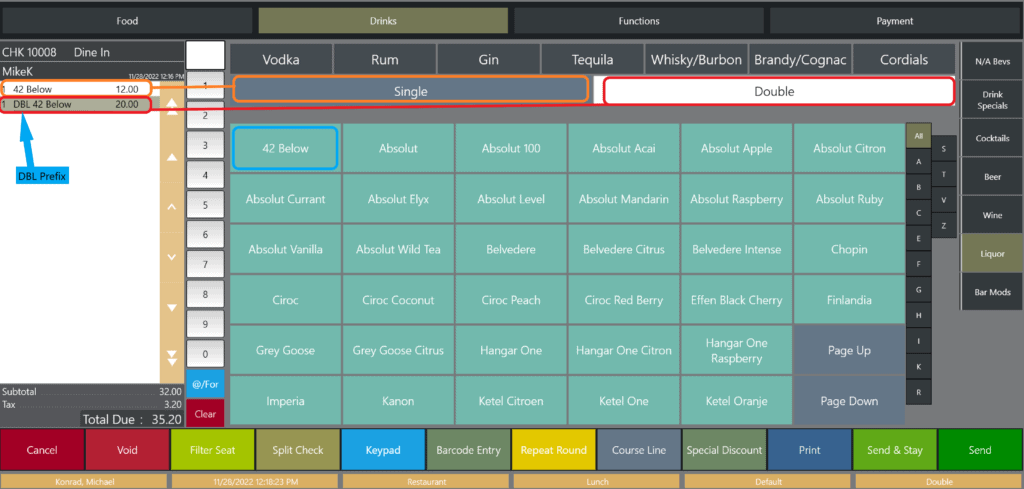
The prefix and suffix can be used to print on the order devices to specify if that item is different in any way. Example: for the double shot, we enter a “DBL” prefix, so the bartender knows to make it a double shot. 

The option bits available are Default and Anonimous. We only need to set the default if needed, as anonymous levels used with Conversational order will only use custom menu levels. 

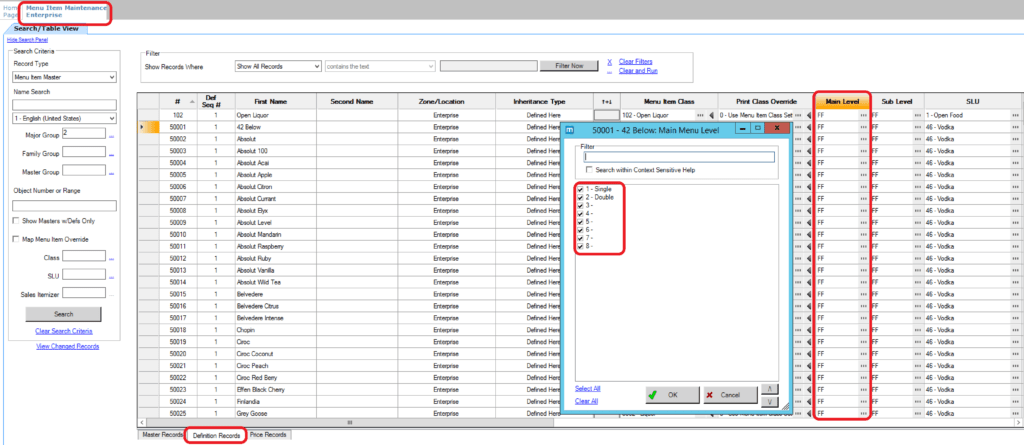
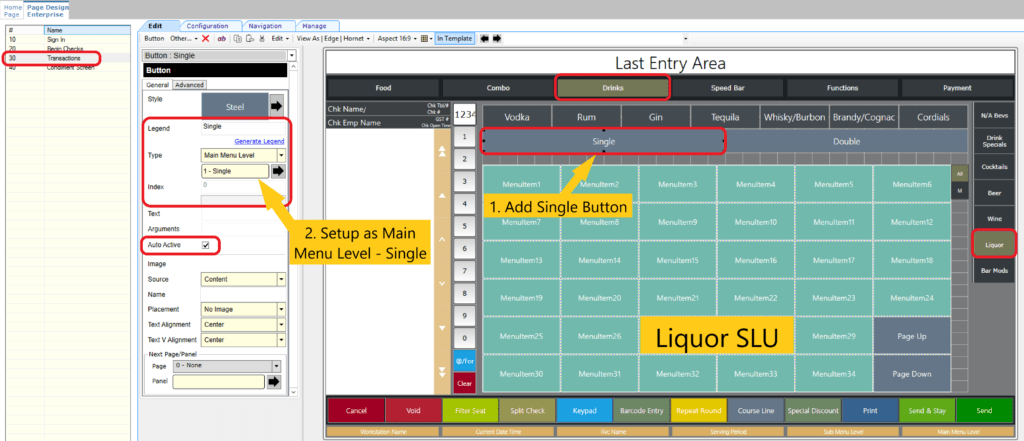
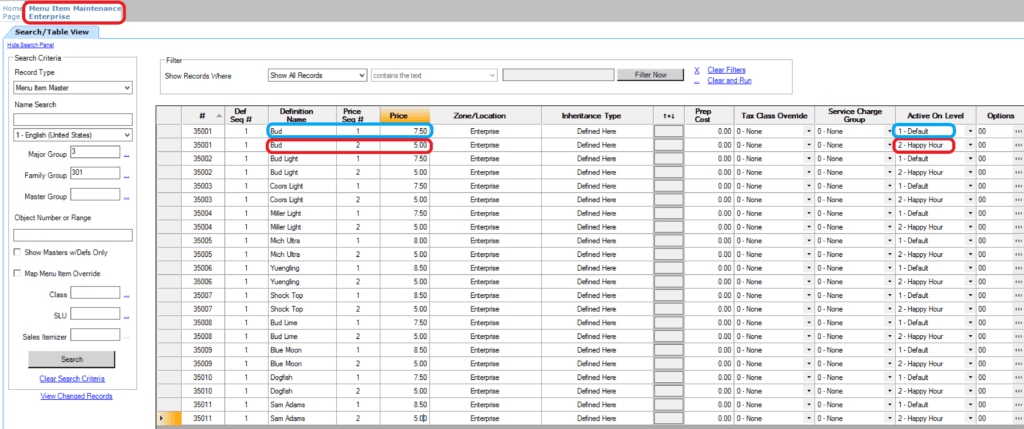
We use our Main Menu Levels for Single/Double shot of liquor at the bar and this is how the configuration looks like: 

Menu-Levels-main levels

We use our Sub Menu Levels for custom pricing for Happy Hour and Early Bird promotions and this is how we have them programmed: 

Menu-Levels-sub levels

Assigning Menu Levels and Hierarchy

We can define the menu levels in several locations in EMC:

  • Menu Item Classes (main and sub menu level defaults)
  • Menu Item Maintenance (main and sub menu levels availability in definition and prices)
  • Auto Menu Levels (automatic switching at specific times)
  • RVC Parameters (main and sub menu level defaults)
  • Serving Periods (main and sub menu level defaults)
  • Page design (button assignments for manual switching)

Because we can assign the menu levels in multiple locations, there is a hierarchy that the workstation will use if it encounters conflicting information from the different modules. This hierarchy is as follows from highest to lowest:

  1. Serving Periods
  2. Auto Menu Levels
  3. RVC Parameters
  4. Menu Item Classes
  5. Main and Sub Level configuration 
  6. If no defaults are assigned (Main and Sub Level 1 are the default)

I recommend you setup menu level defaults only if needed for that specific configuration, you should not have them selected “just incase.” 

Configuring Single/ Double Shots

Now that we have a good understanding of what menu levels are and how we program them let’s take a look at how we use our Main Menu Levels to program single and double shots for liquor drinks. Please note that you can also use sub menu levels for this if you use the main levels for something else. You should not have any menu level defaults set up for the main levels for this configuration in any module. 

Why use Menu Levels to configure Single/Double Shot?

We could just ring in 2 vodkas, and that would constitute a double shot, and if that is your restaurant’s policy, then you don’t need to worry about Menu Levels. 

The reason most places use Menu Levels for single/double is to give the customer a discount when ordering a double shot to incentivize sales. A single shot of Absolute would be $12, and a double shot $20. By giving them a $4 discount and training the servers and bartenders to offer this prompt to the customers, we can increase the check average significantly. We could implement this using an Automatic Discount, but it’s much better using menu levels. 

Configuring Menu Item Classes

First, we have to set up our Menu Item Classes to use the Main Menu Levels:

  • Open your menu item classes module and locate the liquor 
  • Ensure there are no main level defaults selected
  • Un-check option bit #10 to use the Main Level Prices
  • Check option bits #26 and #28 to correctly use repeat rounds and print the prefixes and suffixes on the order device and guest checks.

NOTE: If you use Sub Menu Levels, check option bit #10

Menu-Levels-item classes

Configuring Menu Item Definitions

Next, we will configure the menu item definitions in the Menu Items Maintenace module. 

  • Open the Menu Item Maintenance Module
  • Filter only Major Group Liquor (to make it easier to program)
  • Ensure all items are available on all main and sub levels (all boxes checked)

Configuring Menu Item Prices

Now we need to configure the price records as well. We will add 2 price records: one for a single shot and one for a double shot, and make each one available on a different menu level. 

  • Open the Price Records Tab
  • Add price record 2 for each liquor item
  • Assing price record 1 to the Single Level and enter the price ($12)
  • Assing price record 2 to the Double Level and enter the price ($20)

Your configuration should look like this:

Configuring Page Design Buttons

Now that we configured our menu items and menu levels, we need to add buttons to page design in order to switch between single and double.

  • Open Page Design and find your Liquor screen. 
  • Add 2 buttons at the top of the liquor SLU and name them Single and Double
  • For the Type, select Main Menu Level and assign the Single and Double Levels to each button respectively. 
  • Enable the Auto Active check box to identify which Menu Level is selected

Testing on the workstation

Run the following test:

  • First, Open a check and go to the liquor screen
  • Select the Single button and order one shot of 42 Below for $12.
  • Select the Double button and order the 42 Below again, this time, you will get the DBL prefix, so the bartender knows to make a double, and the price is $20.

For more Free Content on other Simphony modules, also check out our Training Article.

Configuring Happy Hour

We offer Happy Hour at the bar every day between 5 PM and 7 PM. All domestic beer costs $5 during this time. 

In order to configure Happy Hour, we will use sub menu level prices and Auto Menu Levels. 

If both your Main and Sub Menu Levels are already being used, you can use an Automatic Discount. Check out my article on automatic discounts to find out more.

Configuring the Sub Menu Levels

We will first configure the Sub Menu Levels:

  • Open the Menu Levels Sets module
  • Select Sub Menu Levels
  • For level 1, enter Default
  • For level 2, Enter Happy Hour and HH for the Prefix
  • For options, enable the Default for level 1.

You should not define any other Sub Menu Level defaults in the Menu Item Classes, RVC Parameters, or Serving Periods. 

Configuring the Menu Item Classes

Next, we have to set up our Beer Menu Item Class to use the Sub Menu Levels:

  • Open your menu item classes module and locate the beer
  • Ensure there are no sub level defaults selected
  • Check option bits #10, #26, and #28 to enable sub menu level pricing, correctly use repeat rounds and print the prefixes and suffixes on the order device and guest checks.

Configuring Menu Item Definitions

Next, we will configure the menu item definitions in the Menu Items Maintenance module. 

  • Open the Menu Item Maintenance Module
  • Filter only Major Group Beer (to make it easier to program)
  • Ensure all items are available on all main and sub levels (all boxes checked)

Configuring Menu Item Prices

Now we need to configure the price records as well. We will add 2 price records: one for the default price and one for the Happy Hour price, and make each one available on a different menu level. 

  • Open the Price Records Tab
  • Add price record 2 for each beer
  • Assing price record 1 to the Default Level and enter the price ($7.50)
  • Assing price record 2 to the Happy Hour Level and enter the price ($5.00)

Your configuration should look like this:

Configuring Auto Menu Levels

When Programming Happy Hour, it’s best to use auto menu levels to change when the Happy Hour becomes active, rather than doing it manually as we did with Single/ Double. 

  • Open the Auto Menu levels module, just below the Menu Level Sets
  • We have eight configurations available, and we will add them in order
  • On line 1, set the start time at 00:00 and end at 17:00
  • For sub menu level, select the Default
  • For option bits, enable everything (active on all days)
  • On line 2, set the start time at 17:00 and end at 19:00
  • For sub menu level, select Happy Hour
  • For option bits, also enable everything

The workstation will read the conditions in order:

  • If line 1 is true, it will apply and stop. 
  • If line 1 is not true, it will read line 2, if that one is true, it will apply and stop.
  • If none of the lines are true, it will default to Main and Sub Level 1.
  • Keep that in mind if you have any overlapping time slots. The workstation cannot activate 2 levels at once, it will just activate the first one. 

Note: Simphony uses military time, so no AM/PM is allowed. 

Testing on the Workstation

Run the following test:

  • First, Open a check and go to the beer screen
  • Select a domestic beer before 5 PM and send the check ( Bud – $7.50)
  • Wait until 5:01 PM and select the same beer and check the price, it should be only $5, and the “HH” Prefix should appear in from of the name of the item.
Menu-Levels-workstation2

If you are looking for comprehensive Simphony Training, we have a complete online course and support platform. More details below.

Now it's your turn!

I hope you enjoyed my article on Menu Levels in Micros Simphony, and you will find it useful the next time you have to program them. 

  • Do you have any other questions on Menu Levels?
  • Do you use Menu Levels in your system?
  • Do you prefer Auto Discounts or Menu Levels for Happy Hour?
  • Let me know in the comments below!

10 thoughts on “Menu Levels in Micros Simphony: Single/Double, Happy Hour Configuration”

  1. Avatar

    I have configured everything according to your tutorial and it works, thank you. But when I press a button assigned to change the main level the screen automatically changes to the first tab, how to keep the currently opened screen when menu level is changed?

    1. Avatar

      Can you check the print class for DBL in the Menu Item Maintenance module (definition tab). Make sure the print classes is set the same as all the others. You may have the wrong one selected, or you have an override that doesn’t allow it to print.

  2. Avatar

    I followed all of your steps without any problems – until Auto Menu Levels. It doesn’t look like I have access to those.

    I have also tried doing Happy Hour through discounts. It doesn’t seem to work for me!

  3. Avatar

    This is all set up however the DBL prefix is not printing to the bar to let thr bartender know they need to make it a double. have I missed something?
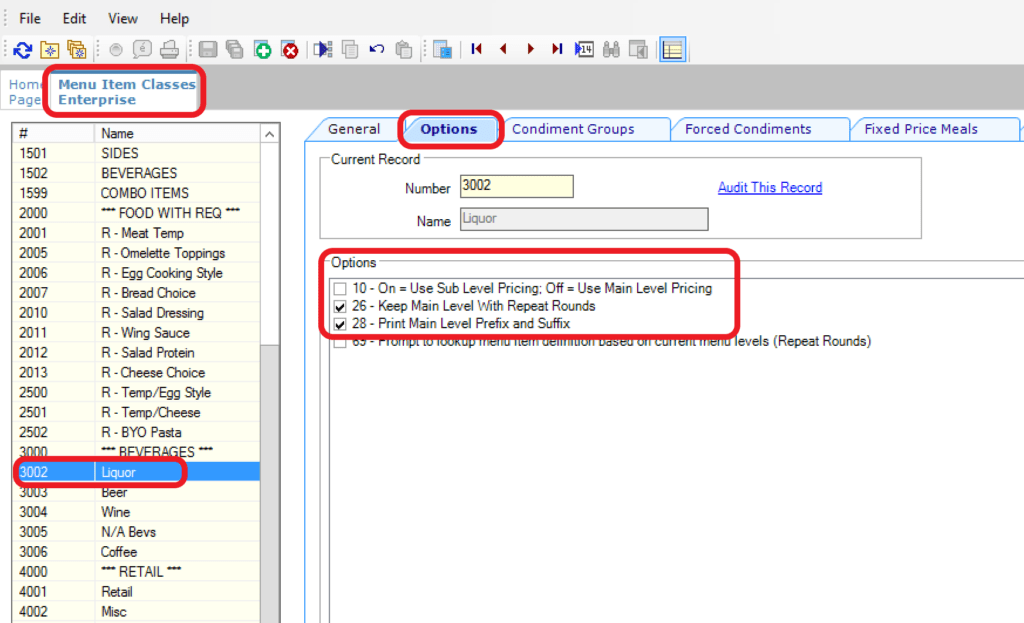
  4. Avatar

    I have setup the happy hour in the same way. My Question is when, some guest took happy hour item during the happy hour and they took some items which are not included in happy hour. now when its come to discount. we apply 20% discount on the check but the discount is calculating on non happy hour items as well as on Happy hour items also. we want to restricted this option and happy hour items should not calculate the discounts. how we could configure this.

    further i used the Menu Item Triggered group and exclude the Happy hour Items. but now the discount is not calculating on happy hour items but after the happy hour time we are unable to give discount on those happy hour items which i excluded through MI Trigger Group in Discounts. Please help me to fix this issue.

    1. Avatar

      Create a menu item Group that includes only the HH items, and then assign that group to you Happy Hour. That should allow that discount to trigger only on those items included in the group.

Leave a Comment

Your email address will not be published. Required fields are marked *

Get Exclusive Simphony Tips

Receive the same Tips I used to manage my Simphoony POS

*We respect your privacy and Do Not Spam.

Please share this article

Scroll to Top